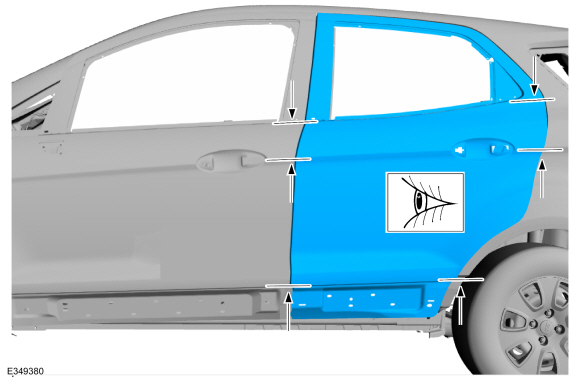
Ford Ecosport: Side Panel Sheet Metal Repairs / Removal and Installation - Rear Door Skin Panel
Ford Ecosport 2014-2025 Service and Repair Manual / Body and Paint / Side Panel Sheet Metal Repairs / Removal and Installation - Rear Door Skin Panel
Special Tool(s) / General Equipment
| Grinder | |
| Hot Air Gun | |
| Knife | |
| Locking Pliers |
Materials
| Name | Specification |
|---|---|
| Metal Bonding Adhesive TA-1, TA-1-B, 3M™ 08115, LORD Fusor® 108B, Henkel Teroson EP 5055 |
- |
| Seam Sealer TA-2-B, 3M™ 08308, LORD Fusor® 803DTM |
- |
| Flexible Foam Repair 3M™ 08463, LORD Fusor® 121 |
- |
Removal
NOTE: Left hand (LH) side shown, right hand (RH) side similar.
-
Inspect the upper and lower door hinges for wear or damage, install new or rebuild as necessary.
 |
-
Remove the rear door window regulator.
Refer to: Rear Door Window Regulator (501-11 Glass, Frames and Mechanisms, Removal and Installation).
-
Remove the rear door.
Refer to: Rear Door (501-03 Body Closures, Removal and Installation).
-
Remove the rear door exterior trim.
Refer to: Rear Door Moulding (501-08 Exterior Trim and Ornamentation, Removal and Installation).
-
Remove the rear door upper moulding.
Refer to: Rear Door Upper Moulding (501-08 Exterior Trim and Ornamentation, Removal and Installation).
-
Remove the rear door latch.
Refer to: Rear Door Latch (501-14 Handles, Locks, Latches and Entry Systems, Removal and Installation).
-
Remove the door module.
Refer to: Rear Door Module (RDM) (419-10 Multifunction Electronic Modules, Removal and Installation).
-
Remove the rear door speaker.
Refer to: Rear Door Speaker (415-00 Information and Entertainment System - General Information, Removal and Installation).
-
Carefully cut through the outer panel only.
Use the General Equipment: Grinder
 |
-
Remove the outer door panel.
Use the General Equipment: Hot Air Gun
Use the General Equipment: Knife
 |
-
Remove the remaining portion of the rear door panel hem flange.
Use the General Equipment: Knife
Use the General Equipment: Hot Air Gun
 |
Installation
NOTE: Left hand (LH) side shown, right hand (RH) side similar.
-
Sand to remove e-coat from the mating surface of the door skin and clean.
 |
-
Sand to remove all adhesive and foreign materials from the door shell to door skin mating surfaces and clean.
 |
-
NOTE: Hem closing and panel alignment must be completed before the adhesive has begun to cure.
Apply adhesive .
Material: Metal Bonding Adhesive / TA-1, TA-1-B, 3M™ 08115, LORD Fusor® 108B, Henkel Teroson EP 5055
 |
-
Install the outer door panel and using a door panel
installation tool or hammer and dolly method, partially close the door
hem flange around the perimeter of the door assembly.
Use the General Equipment: Locking Pliers
 |
-
Install the door and check for proper alignment, Adjust as necessary.
 |
-
Remove the door from the vehicle.
 |
-
Using a hammer and dolly or door skin installation tool,
complete the flanging process around the door assembly perimeter.
Smooth any residual adhesive squeeze-out in to the hem flange seam to
act as a sealer.
 |
-
Apply expandable NVH foam sealant as indicated.
Material: Flexible Foam Repair / 3M™ 08463, LORD Fusor® 121
 |
-
Sand and clean the door hem flange area.
 |
-
Prime the door flange area using a Ford approved paint system.
 |
-
Seam Sealing:All seams must be sealed to production level.
Material: Seam Sealer / TA-2-B, 3M™ 08308, LORD Fusor® 803DTM
 |
-
Refinish the door seam using a Ford approved paint system.
|
-
Refinish the repair using a Ford approved paint system and typical refinishing techniques.
-
Restore corrosion protection.
Refer to: Corrosion Prevention (501-25 Body Repairs - General Information, General Procedures).
-
Install rear door speaker.
Refer to: Rear Door Speaker (415-00 Information and Entertainment System - General Information, Removal and Installation).
-
Install the door module.
Refer to: Rear Door Module (RDM) (419-10 Multifunction Electronic Modules, Removal and Installation).
-
Install the rear door latch.
Refer to: Rear Door Latch (501-14 Handles, Locks, Latches and Entry Systems, Removal and Installation).
-
Install the rear door upper moulding.
Refer to: Rear Door Upper Moulding (501-08 Exterior Trim and Ornamentation, Removal and Installation).
-
Install the rear door exterior trim.
Refer to: Rear Door Moulding (501-08 Exterior Trim and Ornamentation, Removal and Installation).
-
Install the rear door window regulator.
Refer to: Rear Door Window Regulator (501-11 Glass, Frames and Mechanisms, Removal and Installation).
-
Install the door.
Refer to: Rear Door (501-03 Body Closures, Removal and Installation).
-
Align the door.
Refer to: Rear Door Alignment (501-03 Body Closures, General Procedures).

 Removal and Installation - Rocker Panel
Special Tool(s) /
General Equipment
Resistance Spotwelding Equipment
Hot Air Gun
Air Body Saw
MIG/MAG Welding Equipment
Spot Weld Drill Bit
Locking Pliers
Removal
Remove the front door...
Other information:
Ford Ecosport 2014-2025 Service and Repair Manual: Removal and Installation - Crankshaft Position (CKP) Sensor
Special Tool(s) / General Equipment 303-1521Alignment Tool, Crankshaft Position SensorTKIT-2010C-FLM 303-507Timing Peg, Crankshaft TDCTKIT-2001N-FLMTKIT-2001N-ROW Ford Diagnostic Equipment Removal NOTE: Do not loosen or remove the crankshaft pulley bolt without first installing the special tools as instructed in this procedure...
Ford Ecosport 2014-2025 Service and Repair Manual: Removal and Installation - Instrument Panel
Special Tool(s) / General Equipment Locking Pliers Removal NOTE: Removal steps in this procedure may contain installation details. NOTE: During the removal or installation of components, cap, tape or otherwise appropriately protect all openings and tubes/fittings to prevent the ingress of dirt or other contamination...
Categories
- Manuals Home
- 2nd Gen Ford Ecosport Service Manual (2014 - 2025)
- Removal and Installation - Front Seat
- Removal and Installation - Fuel Pump and Sender Unit
- Removal and Installation - Catalytic Converter
- Removal and Installation - Starter Motor
- Description and Operation - Evaporative Emissions - System Operation and Component Description
Removal and Installation - Steering Column Shaft
Removal
NOTE: Removal steps in this procedure may contain installation details.
NOTICE: Do not allow the steering column to rotate while the steering column shaft is disconnected or damage to the steering column internal sensor may result.
NOTE: Use a steering wheel holding device (such as Hunter® 28-75-1 or equivalent)
Hold the steering wheel in the straight-ahead position.
Copyright © 2025 www.foecosport2.com