Ford Ecosport: Side Panel Sheet Metal Repairs / Removal and Installation - Rocker Panel
Special Tool(s) /
General Equipment
| Resistance Spotwelding Equipment |
| Hot Air Gun |
| Air Body Saw |
| MIG/MAG Welding Equipment |
| Spot Weld Drill Bit |
| Locking Pliers |
Removal
-
-
Remove the front door.
Refer to: Front Door (501-03 Body Closures, Removal and Installation).
-
Remove the rear door.
Refer to: Rear Door (501-03 Body Closures, Removal and Installation).
-
Remove the fender splash shield .
Refer to: Fender Splash Shield (501-02 Front End Body Panels, Removal and Installation).
-
Remove the A-pillar trim panel .
Refer to: A-Pillar Trim Panel (501-05 Interior Trim and Ornamentation, Removal and Installation).
-
Remove the B-pillar lower trim panel .
Refer to: B-Pillar Trim Panel (501-05 Interior Trim and Ornamentation, Removal and Installation).
-
Remove the rear quarter trim panel .
Refer to: Loadspace Trim Panel (501-05 Interior Trim and Ornamentation, Removal and Installation).
-
Remove the rear door lower door hinge at the B-pillar.
-
Release the clips and remove the front door scuff plate trim panel.
-
Release the clips and remove the rear door scuff plate trim panel.
-
Remove the rocker panel moulding.
Refer to: Rocker Panel Moulding (501-08 Exterior Trim and Ornamentation, Removal and Installation).
-
Remove the front seat.
Refer to: Front Seat (501-10A Front Seats, Removal and Installation).
-
Remove the rear seat cushion.
Refer to: Rear Seat Cushion (501-10B Rear Seats, Removal and Installation).
-
Remove the rear seat backrest.
Refer to: Rear Seat Backrest (501-10B Rear Seats, Removal and Installation).
-
Reposition the carpeting and the wiring harness away from the working area.
-
Remove the rear fender splash shield.
Refer to: Rear Fender Splash Shield (501-08 Exterior Trim and Ornamentation, Removal and Installation).
-
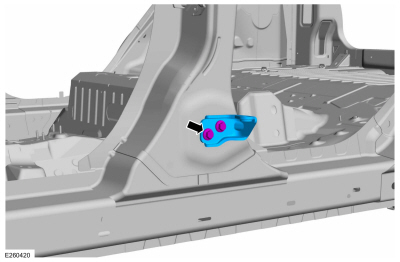
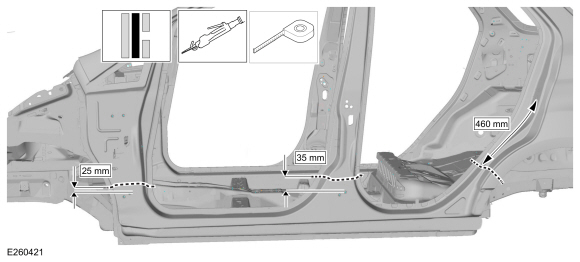
Measure and cut the rocker panel section.
-
Use the General Equipment: Air Body Saw
-
Remove welds
-
Use the General Equipment: Spot Weld Drill Bit
-
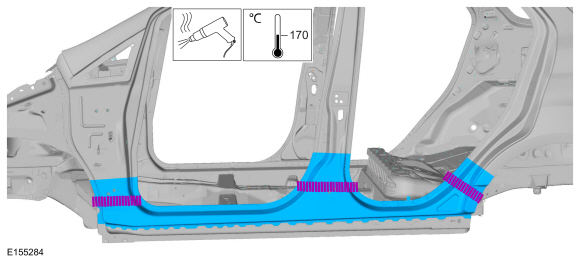
Break the adhesive bond as indicated
-
Use the General Equipment: Hot Air Gun
-
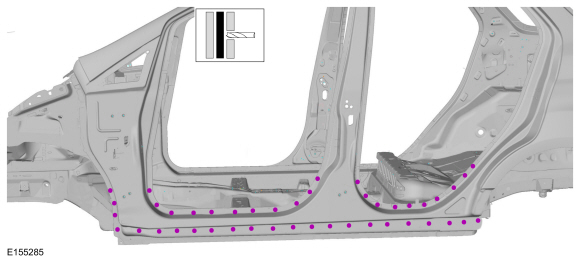
Break the adhesive bond and remove the rocker panel.
-
Use the General Equipment: Hot Air Gun
Installation
-
NOTE:
Sealer or adhesive must not be applied in welding
zones. Areas which were bonded or sealed needs to be thoroughly sealed
afterwards.
Refer to sealer, underbody protection material and adhesives in the workshop manual.
Refer to: Sealer, Underbody Protection Material and Adhesives (501-25
Body Repairs - General Information, Description and Operation).
-
-
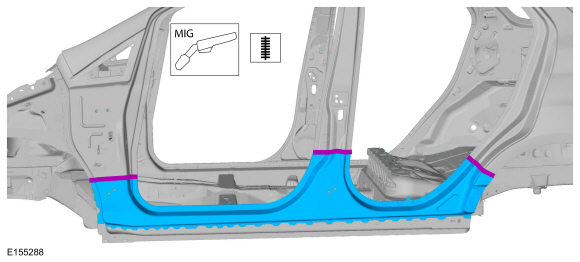
Install properly position and clamp the panel.
Use the General Equipment: Locking Pliers
-
-
Weld using a MIG welder.
Use the General Equipment: MIG/MAG Welding Equipment
-
-
Install the welds.
Use the General Equipment: Resistance Spotwelding Equipment
-
Metal finish the repair as necessary using typical metal finishing techniques and materials.
-
Refinish the repair using a Ford approved paint system.
-
-
Install the front door.
Refer to: Front Door (501-03 Body Closures, Removal and Installation).
-
Install the rear door.
Refer to: Rear Door (501-03 Body Closures, Removal and Installation).
-
Install the fender splash shield .
Refer to: Fender Splash Shield (501-02 Front End Body Panels, Removal and Installation).
-
Install the A-pillar trim panel .
Refer to: A-Pillar Trim Panel (501-05 Interior Trim and Ornamentation, Removal and Installation).
-
Install the B-pillar lower trim panel .
Refer to: B-Pillar Trim Panel (501-05 Interior Trim and Ornamentation, Removal and Installation).
-
Install the rear quarter trim panel .
Refer to: Loadspace Trim Panel (501-05 Interior Trim and Ornamentation, Removal and Installation).
-
Install the rear door lower door hinge at the B-pillar.
Torque:
26 lb.ft (35 Nm)
-
Install the front door scuff plate trim panel by using the press clips.
-
Install the rear door scuff plate trim panel by using the press clips.
-
Install the rocker panel moulding.
Refer to: Rocker Panel Moulding (501-08 Exterior Trim and Ornamentation, Removal and Installation).
-
Install the front seat.
Refer to: Front Seat (501-10A Front Seats, Removal and Installation).
-
Install the rear seat cushion.
Refer to: Rear Seat Cushion (501-10B Rear Seats, Removal and Installation).
-
Install the rear seat backrest.
Refer to: Rear Seat Backrest (501-10B Rear Seats, Removal and Installation).
-
Align the front and rear doors.
Refer to: Front Door Alignment (501-03 Body Closures, General Procedures).
Refer to: Rear Door Alignment (501-03 Body Closures, General Procedures).
Special Tool(s) /
General Equipment
Resistance Spotwelding Equipment
Grinder
Belt Sander
8 mm Drill Bit
MIG/MAG Welding Equipment
Spot Weld Drill Bit
Locking Pliers
Removal
NOTE:
The rocker panel inner reinforcement is made of DP (Dual
Phase) 800 steel and cannot be sectioned...
Other information:
Item
Description
1
LH and RH front impact severity sensors
2
BECMB
3
Passenger front door side impact sensor
4
OCSM (includes OCS sensor and gel-filled bladder)
5
PAD indicator
6
RCM
7
Front passenger seatbelt buckle (includes buckle sensor)
8
Driver and passenger..
Diagnostic Trouble Code (DTC) Chart
Diagnostics in this manual assume a certain skill level and knowledge of Ford-specific diagnostic practices. REFER to: Diagnostic Methods (100-00 General Information, Description and Operation).
Module
DTC
Description
Action
PCM
P00FE:00
EVAP System Tank Vapor Line Restricted/Blocked: No Sub Type Information
GO to Pinpoint Test H..


 Removal and Installation - Rocker Panel Inner Reinforcement