Ford Ecosport: Rear Suspension - AWD / Removal and Installation - Rear Stabilizer Bar
Removal
NOTICE: Suspension fasteners are critical parts that affect the performance of vital components and systems. Failure of these fasteners may result in major service expense. Use the same or equivalent parts if replacement is necessary. Do not use a replacement part of lesser quality or substitute design. Tighten fasteners as specified.
NOTE: Removal steps in this procedure may contain installation details.
-
With the vehicle in NEUTRAL, position it on a hoist.
Refer to: Jacking and Lifting - Overview (100-02 Jacking and Lifting, Description and Operation).
-
NOTICE: Make sure that the ball joint ball does not rotate.
On both sides.
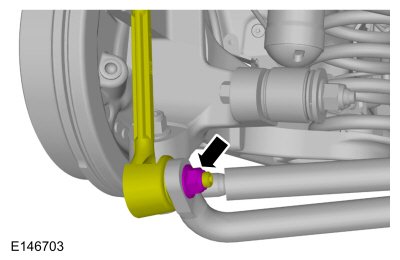
Remove and discard the stabilizer bar link nut and position aside the stabilizer bar link.
 |
-
If equipped.
Remove the retainers and remove the rear drive axle undershield.
 |
-
NOTE: Use the hex-holding feature to prevent the stud from turning while removing or installing the nut.
Remove and discard the stabilizer bar bracket retainers and remove the stabilizer bar.
 |
-
NOTE: Note the position of each component before removal.
Remove the rear stabilizer bar brackets by pressing out of rear stabilizer bar bushings.
 |
-
NOTE: Note the position of each component before removal.
Remove the rear stabilizer bar bushings.
 |
Installation
-
To install, reverse the removal procedure.
-
NOTE: This step is only necessary when installing a new component.
NOTE: Inspect and, if necessary, install new stabilizer bar bushings.
NOTE: Make sure that the component is clean, free of foreign material and lubricant.
NOTE: Make sure that these components are installed to the noted removal position.
On both sides.
The bushing locator bump on both bushings must face the RH side of the vehicle.
 |
-
NOTE: Make sure that the clamp is installed to the same orientation as when removed.
NOTE: Apply water to the brackets to aid in installation.
Press the rear stabilizer bar brackets in place onto the rear stabilizer bar bushings.
 |
-
NOTE: Use the hex-holding feature to prevent the stud from turning while removing or installing the nut.
NOTE: Make sure that the clamp is installed to the same orientation as when removed.
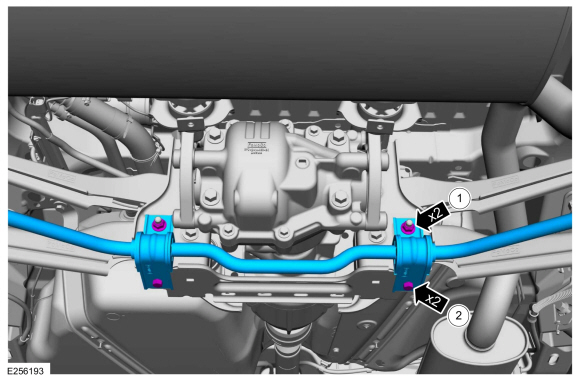
Install the stabilizer bar bracket retainers and the stabilizer bar.
Torque:
1.: 35 lb.ft (48 Nm)
2.: 41 lb.ft (55 Nm)
 |
-
NOTICE: Do not use power tools to remove or install the stabilizer bar link nuts. Damage to the stabilizer bar link ball joints and boots may occur.
NOTICE: Make sure that the ball joint ball does not rotate.
NOTE: The stabilizer bar links are designed with low friction ball joints that have a low breakaway torque.
NOTE: Use the hex-holding feature to prevent the stud from turning while removing or installing the nuts.
On both sides.
Install the rear stabilizer bar link nut and the rear stabilizer bar link.
Torque: 35 lb.ft (48 Nm)
 |
-
If removed.
Install the retainers and the rear drive axle undershield.
Torque: 13 lb.in (1.5 Nm)
 |
-
Check and if necessary adjust rear toe.
Refer to: Rear Toe Adjustment - AWD (204-00 Suspension System - General Information, General Procedures).
-
With the vehicle in NEUTRAL, position it on a hoist.
Refer to: Jacking and Lifting - Overview (100-02 Jacking and Lifting, Description and Operation).
 Removal and Installation - Rear Lower Arm
Special Tool(s) /
General Equipment
Transmission Jack
Removal
NOTICE:
Suspension fasteners are critical parts that affect the
performance of vital components and systems...
 Removal and Installation - Rear Stabilizer Bar Link
Removal
NOTICE:
Suspension fasteners are critical parts that affect the
performance of vital components and systems. Failure of these fasteners
may result in major service expense...
Other information:
Ford Ecosport 2014-2025 Service and Repair Manual: Diagnosis and Testing - Pinpoint Test - DTC: Z, Vehicles With: Rear Seat Side Airbag
B140B:11, B140B:12, B140B:13, B140B:1A Refer to Wiring Diagrams Cell 46 for schematic and connector information. Normal Operation and Fault Conditions The RCM continuously monitors the passenger second row side airbag circuits for the following faults: Resistance out of range Unexpected voltage Short to ground Faulted passenger second row side air..
Ford Ecosport 2014-2025 Service and Repair Manual: Diagnosis and Testing - Body Control Module (BCM)
DTC Chart: Body Control Module (BCM) Diagnostics in this manual assume a certain skill level and knowledge of Ford-specific diagnostic practices. REFER to: Diagnostic Methods (100-00 General Information, Description and Operation). BCM DTC Chart DTC Description Action B1026:04 Steering Col..

 WARNING:
Wear eye and ear protection when servicing a vehicle.
Failure to follow this instruction may result in serious personal
injury.