Ford Ecosport: Rear End Sheet Metal Repairs / Removal and Installation - Rear Side Member
Special Tool(s) / General Equipment
| Resistance Spotwelding Equipment | |
| Locking Pliers |
Materials
| Name | Specification |
|---|---|
| Seam Sealer TA-2-B, 3M™ 08308, LORD Fusor® 803DTM |
- |
Removal
NOTE: Rear doors removed for clarity.
NOTE: Left hand (LH) side shown, right hand (RH) side similar.
NOTE: Factory welds may be substituted with resistance or metal inert gas (MIG) plug welds. Resistance welds may not be placed directly over original location. They must be placed adjacent to original location and match factory welds in quantity. Metal inert gas (MIG) plug welds must equal factory welds in both location and quantity.
NOTE: Adequately protect all adjacent areas against cutting, grinding and welding procedures.
-
Depower the SRS .
Refer to: Supplemental Restraint System (SRS) Depowering (501-20B Supplemental Restraint System, General Procedures).
-
If Required:
Dimensionally restore the vehicle to pre-damage condition.
Refer to: Body and Frame (501-26 Body Repairs - Vehicle Specific Information and Tolerance Checks, Description and Operation).
-
Remove the rocker panel moulding.
Refer to: Rocker Panel Moulding (501-08 Exterior Trim and Ornamentation, Removal and Installation).
-
Remove the rear seat.
Refer to: Rear Seat Backrest (501-10B Rear Seats, Removal and Installation).
-
Remove the B, C and D-pillar trim panels.
Refer to: B-Pillar Trim Panel (501-05 Interior Trim and Ornamentation, Removal and Installation).
Refer to: C-Pillar Lower Trim Panel (501-05 Interior Trim and Ornamentation, Removal and Installation).
Refer to: D-Pillar Trim Panel (501-05 Interior Trim and Ornamentation, Removal and Installation).
-
Remove the luggage compartment trim.
-
Position the carpet and all wiring harnesses away from the working area.
-
If Required:
Remove the muffler and tailpipe.
Refer to: Muffler and Tailpipe (309-00A Exhaust System - 1.0L EcoBoost (92kW/125PS), Removal and Installation).
Refer to: Muffler and Tailpipe - LHD 4WD (309-00C Exhaust System - 2.0L Duratec-HE (129kW/175PS), Removal and Installation).
Refer to: Muffler and Tailpipe - LHD FWD (309-00C Exhaust System - 2.0L Duratec-HE (129kW/175PS), Removal and Installation).
-
If Equipped:
Remove the Rear drum brakes or Rear disc brakes.
Refer to: Beam Axle - Vehicles With: Rear Drum Brakes (204-02A Rear Suspension - FWD, Removal and Installation).
Refer to: Beam Axle - Vehicles With: Rear Disc Brakes (204-02A Rear Suspension - FWD, Removal and Installation).
-
If Equipped:
Remove the upper arm, Rear lower arm and spring.
Refer to: Upper Arm (204-02B Rear Suspension - AWD, Removal and Installation).
Refer to: Rear Lower Arm (204-02B Rear Suspension - AWD, Removal and Installation).
Refer to: Spring (204-02B Rear Suspension - AWD, Removal and Installation).
-
Remove the rear floor panel reinforcement.
Refer to: Rear Floor Panel Reinforcement (501-30 Rear End Sheet Metal Repairs, Removal and Installation).
-
Remove the rear side member reinforcement panel.
Refer to: Rear Side Member Reinforcement Panel (501-30 Rear End Sheet Metal Repairs, Removal and Installation).
-
Remove the rear floor panel.
Refer to: Rear Floor Panel (501-30 Rear End Sheet Metal Repairs, Removal and Installation).
-
Remove the rear floor panel crossmember.
Refer to: Rear Floor Panel Crossmember (501-30 Rear End Sheet Metal Repairs, Removal and Installation).
-
NOTE: Pay particular attention to the location of adhesive and sealer to aid in installation.
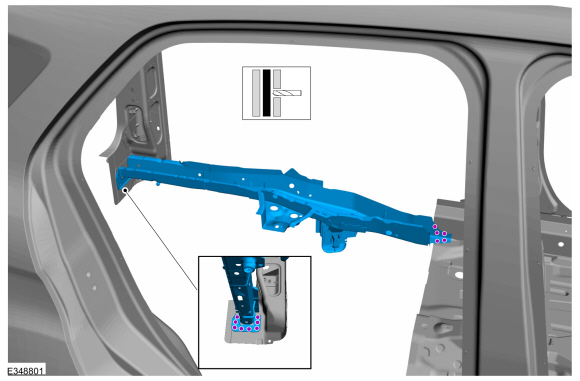
Remove the welds and the side member.
 |
Installation
NOTE: Rear doors removed for clarity.
NOTE: Left hand (LH) side shown, right hand (RH) side similar.
NOTE: Factory welds may be substituted with resistance or metal inert gas (MIG) plug welds. Resistance welds may not be placed directly over original location. They must be placed adjacent to original location and match factory welds in quantity. Metal inert gas (MIG) plug welds must equal factory welds in both location and quantity.
NOTE: Adequately protect all adjacent areas against cutting, grinding and welding procedures.
-
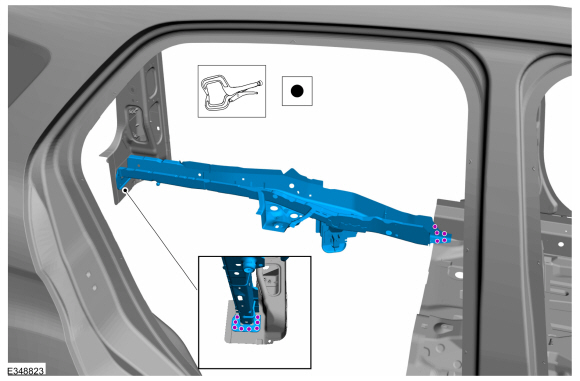
Install, properly position, clamp and welds the side member.
Use the General Equipment: Locking Pliers
Use the General Equipment: Resistance Spotwelding Equipment
 |
-
Dress all welds as necessary using typical metal finishing techniques.
-
Seam Sealing:
All seams must be sealed to production level.
Material: Seam Sealer / TA-2-B, 3M™ 08308, LORD Fusor® 803DTM
-
Refinish the entire repair using a Ford approved paint system
-
Restore corrosion protection.
Refer to: Corrosion Prevention (501-25 Body Repairs - General Information, General Procedures).
-
Install the rear floor panel crossmember.
Refer to: Rear Floor Panel Crossmember (501-30 Rear End Sheet Metal Repairs, Removal and Installation).
-
Install the rear floor panel.
Refer to: Rear Floor Panel (501-30 Rear End Sheet Metal Repairs, Removal and Installation).
-
Install the rear side member reinforcement panel.
Refer to: Rear Side Member Reinforcement Panel (501-30 Rear End Sheet Metal Repairs, Removal and Installation).
-
Install the rear floor panel reinforcement.
Refer to: Rear Floor Panel Reinforcement (501-30 Rear End Sheet Metal Repairs, Removal and Installation).
-
If Equipped:
Install the upper arm, rear lower arm and spring.
Refer to: Upper Arm (204-02B Rear Suspension - AWD, Removal and Installation).
Refer to: Rear Lower Arm (204-02B Rear Suspension - AWD, Removal and Installation).
Refer to: Spring (204-02B Rear Suspension - AWD, Removal and Installation).
-
If Equipped:
Install the Rear drum brakes or Rear disc brakes.
Refer to: Beam Axle - Vehicles With: Rear Drum Brakes (204-02A Rear Suspension - FWD, Removal and Installation).
Refer to: Beam Axle - Vehicles With: Rear Disc Brakes (204-02A Rear Suspension - FWD, Removal and Installation).
-
If Required:
Install the muffler and tailpipe.
Refer to: Muffler and Tailpipe (309-00A Exhaust System - 1.0L EcoBoost (92kW/125PS), Removal and Installation).
Refer to: Muffler and Tailpipe - LHD 4WD (309-00C Exhaust System - 2.0L Duratec-HE (129kW/175PS), Removal and Installation).
Refer to: Muffler and Tailpipe - LHD FWD (309-00C Exhaust System - 2.0L Duratec-HE (129kW/175PS), Removal and Installation).
-
Reposition the carpeting and the wiring harness to original location.
-
Install the luggage compartment trim.
-
Install the rear seat.
Refer to: Rear Seat Backrest (501-10B Rear Seats, Removal and Installation).
-
Install the B, C and D-pillar trim panels.
Refer to: B-Pillar Trim Panel (501-05 Interior Trim and Ornamentation, Removal and Installation).
Refer to: C-Pillar Lower Trim Panel (501-05 Interior Trim and Ornamentation, Removal and Installation).
Refer to: D-Pillar Trim Panel (501-05 Interior Trim and Ornamentation, Removal and Installation).
-
Install the rocker panel moulding.
Refer to: Rocker Panel Moulding (501-08 Exterior Trim and Ornamentation, Removal and Installation).
-
Repower the SRS .
Refer to: Supplemental Restraint System (SRS) Repowering (501-20B Supplemental Restraint System, General Procedures).
 Removal and Installation - Rear Lamp Mounting Panel
Special Tool(s) /
General Equipment
8 mm Drill Bit
MIG/MAG Welding Equipment
Spot Weld Drill Bit
Locking Pliers
Materials
Name
Specification
Seam SealerTA-2-B, 3M™ 08308, LORD Fusor® 803DTM
-
Removal
NOTE:
Factory welds may be substituted with resistance or metal
inert gas (MIG) plug welds...
 Removal and Installation - Rear Side Member Reinforcement Panel
Special Tool(s) /
General Equipment
Resistance Spotwelding Equipment
Hot Air Gun
8 mm Drill Bit
MIG/MAG Welding Equipment
Spot Weld Drill Bit
Locking Pliers
Materials
Name
Specification
Metal Bonding AdhesiveTA-1, TA-1-B, 3M™ 08115, LORD Fusor® 108B, Henkel Teroson EP 5055
-
Removal
NOTE:
Left hand..
Other information:
Ford Ecosport 2014-2025 Service and Repair Manual: General Procedures - Driveshaft Runout and Balancing
Special Tool(s) / General Equipment 100-002 (TOOL-4201-C) Holding Fixture with Dial Indicator Gauge Inspection NOTE: Driveline vibration exhibits a higher frequency and lower amplitude then high-speed shake. Driveline vibration is directly related to the speed of the vehicle and is noticed at various speeds. Driveline vibration can be perceived as a tremor in t..
Ford Ecosport 2014-2025 Service and Repair Manual: General Procedures - Reset the Outside Air Temperature Sensor Learned Values
Configuration NOTE: The ambient air temperature sensor is a critical component for correct Air Conditioning (A/C) and Heating, Ventilation, and Air Conditioning (HVAC) system operation. Make sure after the reset is carried out the temperature is displaying correctly in the vehicle. NOTE: The outside air temperature sensor is also referred to as the ambient air temperatu..
