Ford Ecosport: Rear End Sheet Metal Repairs / Removal and Installation - Back Panel
Ford Ecosport 2014-2025 Service and Repair Manual / Body and Paint / Rear End Sheet Metal Repairs / Removal and Installation - Back Panel
Special Tool(s) / General Equipment
| Resistance Spotwelding Equipment | |
| 8 mm Drill Bit | |
| MIG/MAG Welding Equipment | |
| Spot Weld Drill Bit | |
| Locking Pliers |
Materials
| Name | Specification |
|---|---|
| Seam Sealer TA-2-B, 3M™ 08308, LORD Fusor® 803DTM |
- |
Removal
NOTE: The back panel is constructed of mild steel and High-Strength low alloy (HSLA) 350 grade steel and may be sectioned. The following assumes full component replacement. Adjust to meet repair needs.
-
Restore the vehicle to pre-accident dimensions, if required.
Refer to: Body and Frame (501-26 Body Repairs - Vehicle Specific Information and Tolerance Checks, Description and Operation).
-
Remove the following items:
-
Remove the rear bumper cover.
Refer to: Rear Bumper Cover (501-19 Bumpers, Removal and Installation).
-
Remove the liftgate.
Refer to: Liftgate (501-03 Body Closures, Removal and Installation).
-
Remove the rear bumper cover.
-
Reposition the carpeting and wiring harness away from the repair area.
-
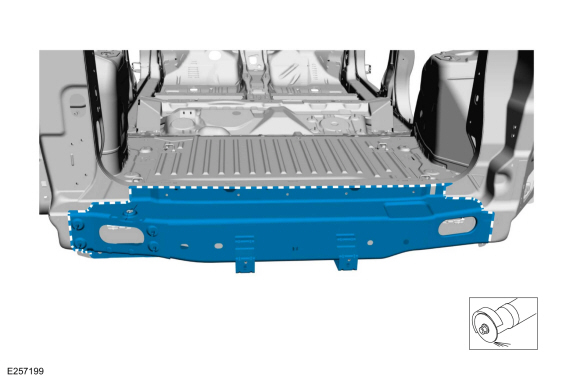
Remove the fasteners and the reinforcement plate.
 |
-
Remove the spot welds.
Use the General Equipment: Spot Weld Drill Bit
 |
-
Use a wire wheel or equivalent tool to remove sealer and remove the back panel.
 |
Installation
-
Refer to: Joining Techniques (501-25 Body Repairs - General Information, General Procedures).
-
Drill holes for plug welding in the replacement panel.
Use the General Equipment: 8 mm Drill Bit
 |
-
Install the panel and clamp in position.
Use the General Equipment: Locking Pliers
 |
-
Spot weld the flanges.
Use the General Equipment: Resistance Spotwelding Equipment
 |
-
Plug weld the panel.
Use the General Equipment: MIG/MAG Welding Equipment
 |
-
Metal finish the welds using typical metal finishing techniques.
-
Sealing work: All areas must be sealed to production level.
Material: Seam Sealer / TA-2-B, 3M™ 08308, LORD Fusor® 803DTM
-
Refinish using a Ford approved paint system.
-
Restore corrosion protection.
Refer to: Corrosion Prevention (501-25 Body Repairs - General Information, General Procedures).
-
Install the reinforcement plate.
Torque: 177 lb.in (20 Nm)
|
-
Install the following items:
-
Install the rear bumper cover.
Refer to: Rear Bumper Cover (501-19 Bumpers, Removal and Installation).
-
Install the liftgate.
Refer to: Liftgate (501-03 Body Closures, Removal and Installation).
-
Install the loadspace trim panel.
Refer to: Loadspace Trim Panel (501-05 Interior Trim and Ornamentation, Removal and Installation).
-
Install the rear bumper cover.
-
Reposition the carpeting and wiring harness.


Other information:
Ford Ecosport 2014-2025 Service and Repair Manual: Specifications
Material Item Specification Fill Capacity High Temperature Nickel Anti-Seize Lubricant XL-2 - - Motorcraft® Wheel and Tire Cleaner ZC-37-A - - General Specifications Item Specification ..
Ford Ecosport 2014-2025 Service and Repair Manual: Description and Operation - Intermediate Clutch Assembly
Intermediate (2, 6) Clutch Exploded View Item Description 1 Transmission case 2 Intermediate clutch piston 3 Intermediate clutch piston return spring 4 Intermediate clutch piston return spring snap ring 5 Intermediate clutch ..
Categories
- Manuals Home
- 2nd Gen Ford Ecosport Service Manual (2014 - 2025)
- Removal and Installation - Front Seat
- Removal and Installation - Rear Bumper
- Description and Operation - Jacking and Lifting - Overview
- Removal and Installation - Block Heater
- Automatic Transmission - 6-Speed Automatic Transmission – 6F35
Removal and Installation - Wheel Knuckle Bushing
Special Tool(s) / General Equipment
Hydraulic PressRemoval
NOTE: Removal steps in this procedure may contain installation details.
Remove the wheel knuckle.Refer to: Wheel Knuckle - Vehicles With: Rear Drum Brakes (204-02B Rear Suspension - AWD, Removal and Installation).
Remove the rear toe adjustment retainers and remove the wheel knuckle mounting bracket.
Torque:
Stage 1: 177 lb.in (20 Nm)
Stage 2: 76 lb.ft (103 Nm)
Copyright © 2025 www.foecosport2.com