Ford Ecosport: Automatic Transmission - 6-Speed Automatic Transmission – 6F35 / Diagnosis and Testing - Transmission Air Pressure Test
Ford Ecosport 2014-2025 Service and Repair Manual / Automatic Transmission / Automatic Transmission - 6-Speed Automatic Transmission – 6F35 / Diagnosis and Testing - Transmission Air Pressure Test
Transmission Air Pressure Test

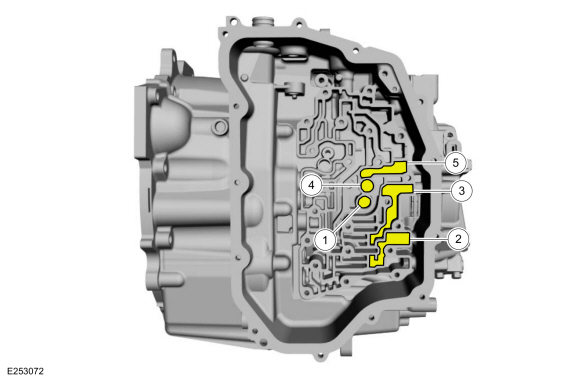
| Item | Description |
| 1 | Foward clutch |
| 2 | Direct clutch |
| 3 | Intermediate clutch |
| 4 | Low reverse clutch |
| 5 | Overdrive clutch |
NOTE: The center support contains an air bleed for the forward and Low reverse clutch circuits. Some leakage during the air test can be normal.
NOTE: The Intermediate clutch pressure chamber contains an air bleed for the Intermediate clutch circuit. Some leakage during the air test can be normal.
A hydraulic clutch concern can be located through a series of checks by substituting air pressure for fluid pressure to determine the location of the concern.
-
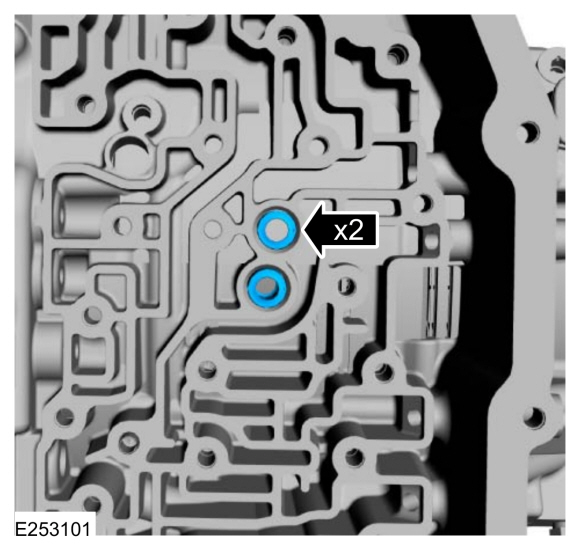
Install the forward clutch and low/reverse clutch main control-to-transmission case seals.

-
Using a rubber tipped blow gun, apply 40 PSI (276 kpa) to the suspect clutch port for 2-3 seconds.
-
A dull thud indicates the clutch piston applied.
-
A hissing noise may indicate a leak in the hydraulic
passages. Hydraulic circuits that use scarf cut seals and/or air bleeds
will have some normal leakage.
-
A dull thud indicates the clutch piston applied.
-
While holding the blow gun nozzle firmly against the port in the transmission case, release the trigger.
-
Wait 1-2 seconds.
-
A hissing noise may indicate a leak in the hydraulic
passages. Hydraulic circuits that use scarf cut seals and/or air bleeds
will have some normal leakage.
-
A hissing noise may indicate a leak in the hydraulic
passages. Hydraulic circuits that use scarf cut seals and/or air bleeds
will have some normal leakage.
-
Remove the blow gun from the port.
-
A sudden release of air pressure indicates the hydraulic passages are capable of holding pressure.
-
No noise may indicate a leak in the hydraulic passages.
Hydraulic circuits that use scarf cut seals and/or air bleeds will have
some normal leakage.
-
A sudden release of air pressure indicates the hydraulic passages are capable of holding pressure.
 Diagnosis and Testing - Transmission Stall Speed Test
Stall Speed Test
WARNING:
Block all wheels, set the parking brake and firmly apply the
service brake to reduce the risk of vehicle movement during this
procedure...
 Diagnosis and Testing - Forward Clutch Assembly
Symptom Chart
Forward Clutch
For forward (1,2,3,4) clutch operation, REFER to: Transmission
Description (307-01B Automatic Transmission - 6-Speed Automatic
Transmission – 6F35, Description and Operation)...
Other information:
Ford Ecosport 2014-2025 Service and Repair Manual: Removal and Installation - Driver Door Window Control Switch
Special Tool(s) / General Equipment Interior Trim Remover Removal NOTE: LHD shown, RHD similar. NOTE: Removal steps in this procedure may contain installation details. Release the clips and the tabs and remove the armrest side trim panel...
Ford Ecosport 2014-2025 Service and Repair Manual: Removal and Installation - Driver Door Module (DDM)
Removal NOTE: Removal steps in this procedure may contain installation details. NOTE: If installing a new module, it is necessary to upload the module configuration information to the diagnostic scan tool prior to removing the module...
Copyright © 2025 www.foecosport2.com

