Ford Ecosport: Roof Sheet Metal Repairs / Removal and Installation - Roof Panel
Special Tool(s) /
General Equipment
| Resistance Spotwelding Equipment |
| Scraper for Straight Edges |
| Hot Air Gun |
| Knife |
| Spot Weld Drill Bit |
Materials
| Name |
Specification |
Metal Bonding Adhesive
TA-1, TA-1-B, 3M™ 08115, LORD Fusor® 108B, Henkel Teroson EP 5055 |
-
|
Roof Ditch Sealer
3M™ 08307, LORD Fusor® 129 |
-
|
Removal
Vehicles with moon roof
-
Depower the SRS
Refer to: Supplemental Restraint System (SRS) Depowering (501-20B Supplemental Restraint System, General Procedures).
-
-
Remove the rear liftgate.
Refer to: Liftgate (501-03 Body Closures, Removal and Installation).
-
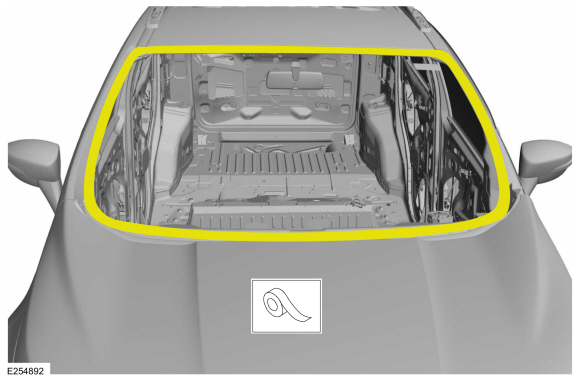
Remove the windshield glass.
Refer to: Fixed Glass (501-11 Glass, Frames and Mechanisms, General Procedures).
-
Remove the roof opening panel frame.
Refer to: Roof Opening Panel Frame (501-17 Roof Opening Panel, Removal and Installation).
-
Remove the A- B- and C-Pillar Trim.
Refer to: A-Pillar Trim Panel (501-05 Interior Trim and Ornamentation, Removal and Installation).
Refer to: B-Pillar Trim Panel (501-05 Interior Trim and Ornamentation, Removal and Installation).
Refer to: Rear Door Trim Panel (501-05 Interior Trim and Ornamentation, Removal and Installation).
-
-
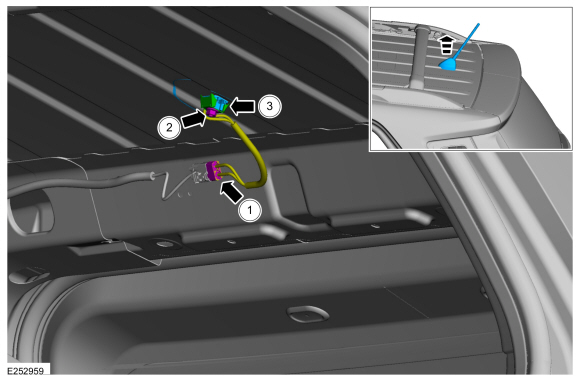
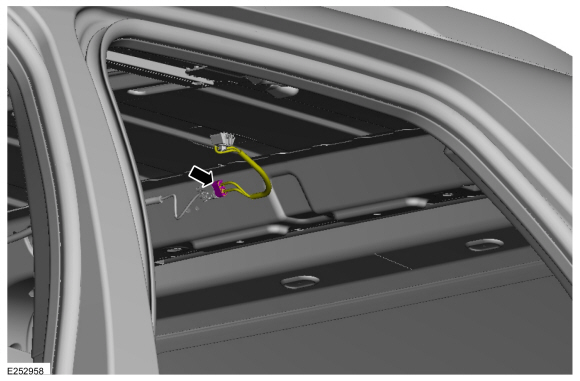
Disconnect the antenna cable.
-
Remove the audio unit antenna base bolt.
-
Remove the audio unit antenna retaining bracket.
-
Remove the side curtain air bag.
Refer to: Side Curtain Airbag (501-20B Supplemental Restraint System, Removal and Installation).
-
Remove the roof rail.
Refer to: Roof Rail (501-08 Exterior Trim and Ornamentation, Removal and Installation).
-
-
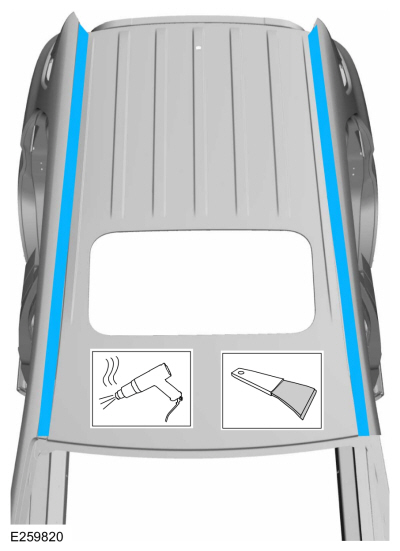
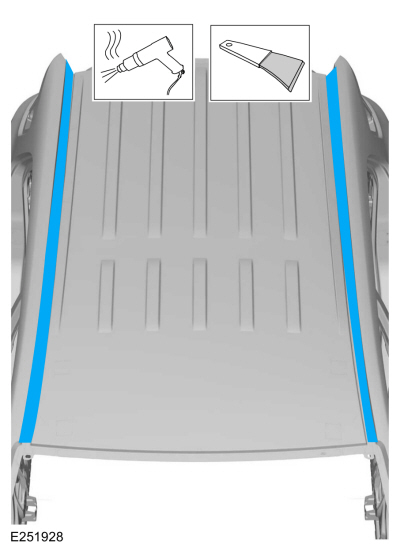
Remove the roof ditch sealer.
Use the General Equipment: Hot Air Gun
Use the General Equipment: Scraper for Straight Edges
-
-
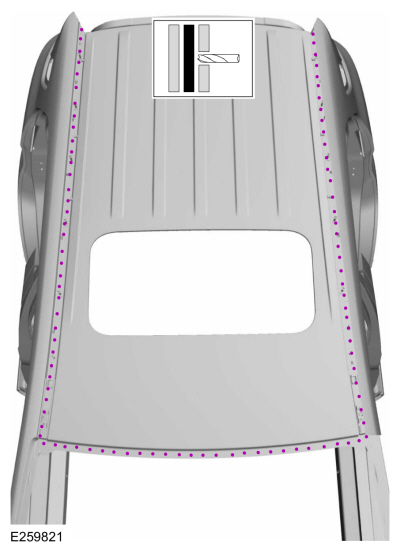
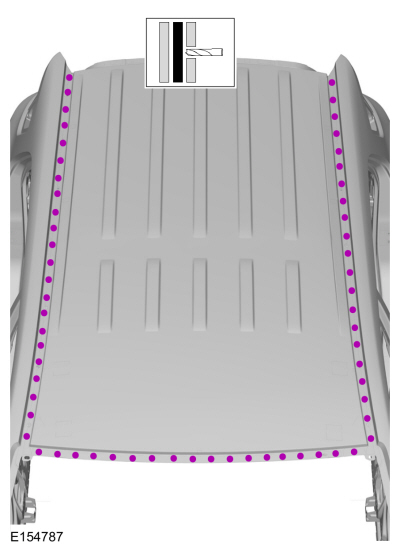
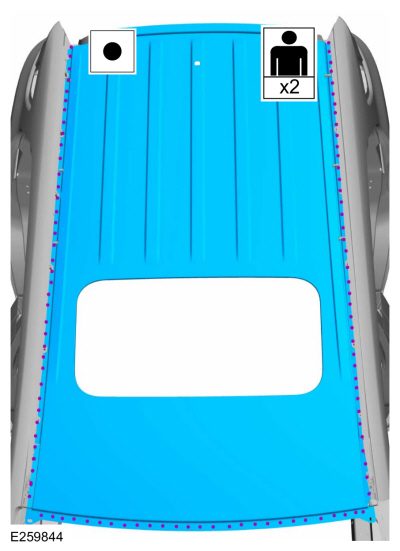
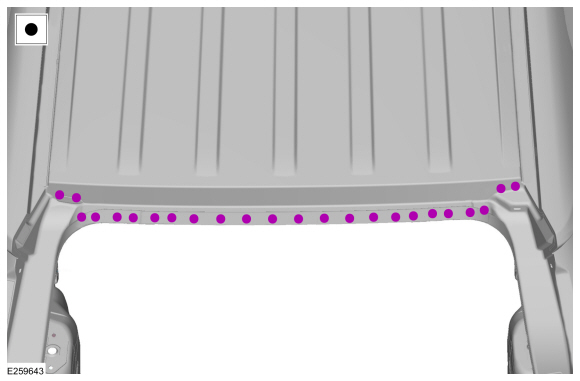
Remove the welds.
Use the General Equipment: Spot Weld Drill Bit
-
-
Remove the welds.
Use the General Equipment: Spot Weld Drill Bit
-
-
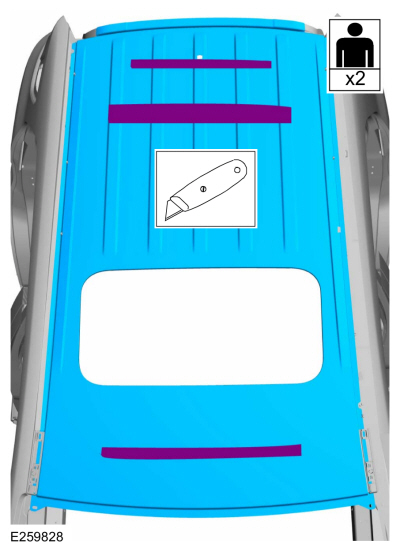
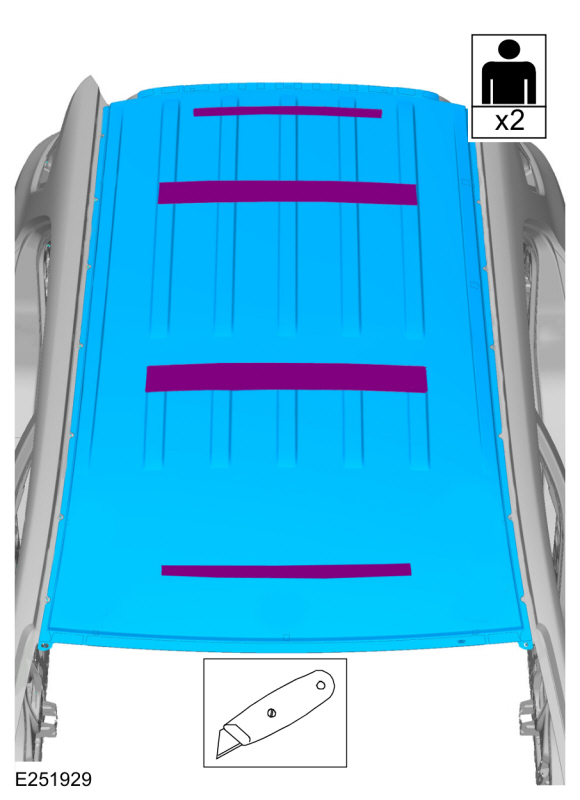
Separate the roof panel from the roof bows leaving as much NVH foam
intact on the bows as possible and with the help of an assistant, remove
the roof panel..
Use the General Equipment: Knife
Vehicles without moon roof
-
Depower the SRS
Refer to: Supplemental Restraint System (SRS) Depowering (501-20B Supplemental Restraint System, General Procedures).
-
-
Remove the rear liftgate.
Refer to: Liftgate (501-03 Body Closures, Removal and Installation).
-
Remove the windshield glass.
Refer to: Fixed Glass (501-11 Glass, Frames and Mechanisms, General Procedures).
-
Remove the head liner.
Refer to: Headliner (501-05 Interior Trim and Ornamentation, Removal and Installation).
-
Remove the A- B- and C-Pillar Trim.
Refer to: A-Pillar Trim Panel (501-05 Interior Trim and Ornamentation, Removal and Installation).
Refer to: B-Pillar Trim Panel (501-05 Interior Trim and Ornamentation, Removal and Installation).
Refer to: Rear Door Trim Panel (501-05 Interior Trim and Ornamentation, Removal and Installation).
-
-
Disconnect the antenna cable.
-
Remove the audio unit antenna base bolt.
-
Remove the audio unit antenna retaining bracket.
-
Remove the side curtain air bag.
Refer to: Side Curtain Airbag (501-20B Supplemental Restraint System, Removal and Installation).
-
Remove the roof rail.
Refer to: Roof Rail (501-08 Exterior Trim and Ornamentation, Removal and Installation).
-
-
Remove the roof ditch sealer.
Use the General Equipment: Hot Air Gun
Use the General Equipment: Scraper for Straight Edges
-
-
Remove the welds.
Use the General Equipment: Spot Weld Drill Bit
-
-
Remove the welds.
Use the General Equipment: Spot Weld Drill Bit
-
-
Separate the roof panel from the roof bows leaving as much NVH foam
intact on the bows as possible and with the help of an assistant, remove
the roof panel..
Use the General Equipment: Knife
Installation
Vehicles with moon roof
-
NOTE:
Before resistance spot welding of body panels
with a total panel thickness of 3 mm and greater, the manufacturer's
welding equipment instructions and sub-section 501-25 must be followed.
-
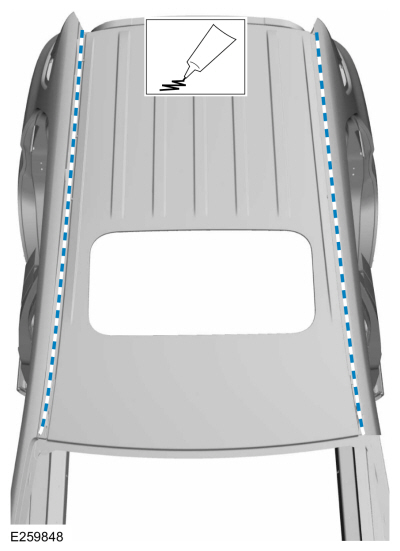
NOTE:
Adhesive must be applied with a minimum height of 20 mm.
-
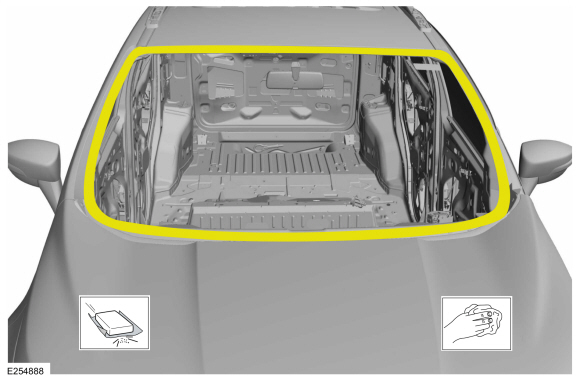
-
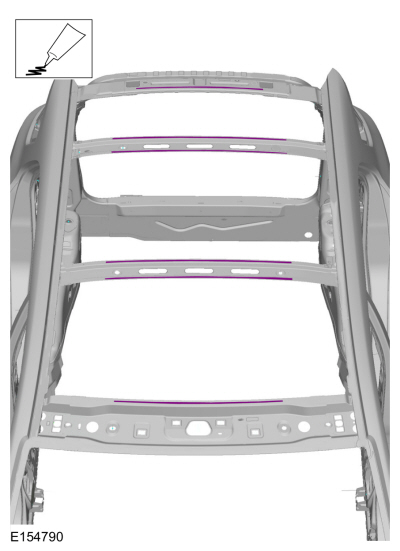
Material: Metal Bonding Adhesive
/ TA-1, TA-1-B, 3M™ 08115, LORD Fusor® 108B, Henkel Teroson EP 5055
-
NOTICE:
Make sure not to have gap between roof panel and roof bows.
NOTE:
To avoid breaking the adhesive bond, do not lift the panel. Slide the roof panel to proper position.
-
With the help of an assistant install the roof panel, properly align and install welds.
Use the General Equipment: Resistance Spotwelding Equipment
-
-
Install the welds.
Use the General Equipment: Resistance Spotwelding Equipment
-
Metal finish the repair area using typical metal finishing procedures.
-
-
Sand the windshield opening channel to remove old adhesive, e-coat and clean.
-
Refinish the entire repair using a Ford approved paint system and typical refinishing techniques.
-
-
Apply a Ford approved epoxy-based primer to the windshield opening channel and allow to dry.
-
-
Mask off the windshield opening channel.
-
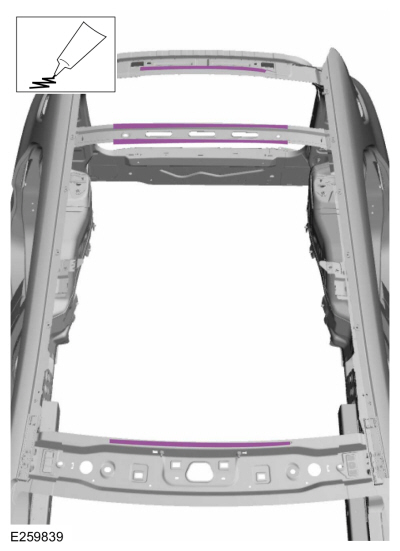
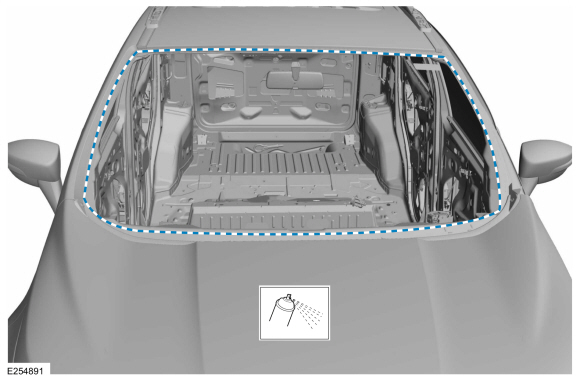
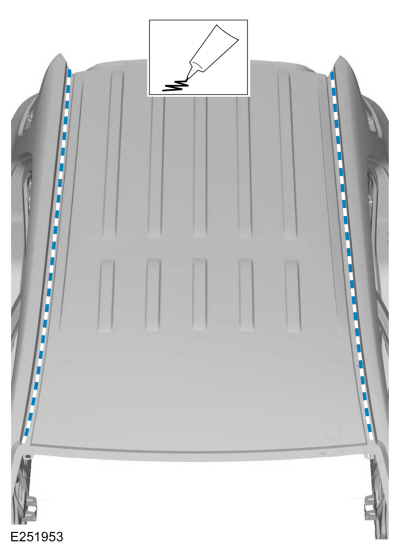
Apply roof ditch sealer.
Material: Roof Ditch Sealer
/ 3M™ 08307, LORD Fusor® 129
-
Refinish the entire repair using a Ford approved paint system and typical refinishing techniques.
-
Unmask the windshield opening channel.
-
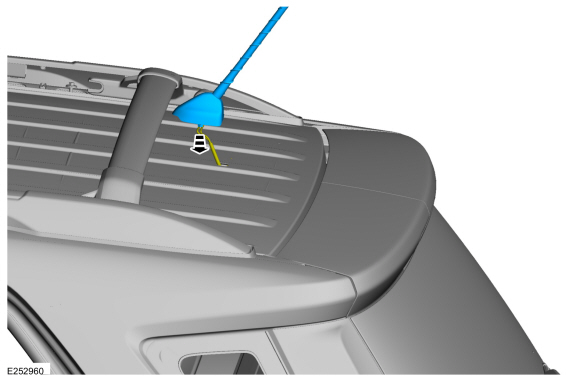
NOTE:
If installing a new audio unit antenna it is not
necessary to remove the bolt from the audio unit antenna base.
Install harness through the opening and push the antenna until the base is fully seated.
-
Connect the audio unit antenna connector.
-
-
Install the side curtain air bag.
Refer to: Side Curtain Airbag (501-20B Supplemental Restraint System, Removal and Installation).
-
Install the roof opening panel frame.
Refer to: Roof Opening Panel Frame (501-17 Roof Opening Panel, Removal and Installation).
-
Install the roof rail.
Refer to: Roof Rail (501-08 Exterior Trim and Ornamentation, Removal and Installation).
-
Install the lift gate.
Refer to: Liftgate (501-03 Body Closures, Removal and Installation).
-
Install the windshield glass.
Refer to: Fixed Glass (501-11 Glass, Frames and Mechanisms, General Procedures).
-
Install the A- B- and C-Pillar Trim panel.
Refer to: A-Pillar Trim Panel (501-05 Interior Trim and Ornamentation, Removal and Installation).
Refer to: B-Pillar Trim Panel (501-05 Interior Trim and Ornamentation, Removal and Installation).
Refer to: Rear Door Trim Panel (501-05 Interior Trim and Ornamentation, Removal and Installation).
-
Adjust the liftgate.
Refer to: Liftgate Alignment (501-03 Body Closures, General Procedures).
-
Repower the SRS .
Refer to: Supplemental Restraint System (SRS) Repowering (501-20B Supplemental Restraint System, General Procedures).
Vehicles without moon roof
-
NOTE:
Before resistance spot welding of body panels
with a total panel thickness of 3 mm and greater, the manufacturer's
welding equipment instructions and sub-section 501-25 must be followed.
-
NOTE:
Adhesive must be applied with a minimum height of 20 mm.
-
-
Material: Metal Bonding Adhesive
/ TA-1, TA-1-B, 3M™ 08115, LORD Fusor® 108B, Henkel Teroson EP 5055
-
NOTICE:
Make sure not to have gap between roof panel and roof bows.
NOTE:
To avoid breaking the adhesive bond, do not lift the panel. Slide the roof panel to proper position.
-
With the help of an assistant install the roof panel, properly align and install welds.
Use the General Equipment: Resistance Spotwelding Equipment
-
-
Install the welds.
Use the General Equipment: Resistance Spotwelding Equipment
-
Metal finish the repair area using typical metal finishing procedures.
-
-
Sand the windshield opening channel to remove old adhesive, e-coat and clean.
-
Refinish the entire repair using a Ford approved paint system and typical refinishing techniques.
-
-
Apply a Ford approved epoxy-based primer to the windshield opening channel and allow to dry.
-
-
Mask off the windshield opening channel.
-
Apply roof ditch sealer.
Material: Roof Ditch Sealer
/ 3M™ 08307, LORD Fusor® 129
-
Refinish the entire repair using a Ford approved paint system and typical refinishing techniques.
-
Unmask the windshield opening channel.
-
NOTE:
If installing a new audio unit antenna it is not
necessary to remove the bolt from the audio unit antenna base.
Install harness through the opening and push the antenna until the base is fully seated.
-
Connect the audio unit antenna connector.
-
-
Install the side curtain air bag.
Refer to: Side Curtain Airbag (501-20B Supplemental Restraint System, Removal and Installation).
-
Install the headliner.
Refer to: Headliner (501-05 Interior Trim and Ornamentation, Removal and Installation).
-
Install the roof rail.
Refer to: Roof Rail (501-08 Exterior Trim and Ornamentation, Removal and Installation).
-
Install the lift gate.
Refer to: Liftgate (501-03 Body Closures, Removal and Installation).
-
Install the windshield glass.
Refer to: Fixed Glass (501-11 Glass, Frames and Mechanisms, General Procedures).
-
Install the A- B- and C-Pillar Trim panel.
Refer to: A-Pillar Trim Panel (501-05 Interior Trim and Ornamentation, Removal and Installation).
Refer to: B-Pillar Trim Panel (501-05 Interior Trim and Ornamentation, Removal and Installation).
Refer to: Rear Door Trim Panel (501-05 Interior Trim and Ornamentation, Removal and Installation).
-
Adjust the liftgate.
Refer to: Liftgate Alignment (501-03 Body Closures, General Procedures).
-
Repower the SRS .
Refer to: Supplemental Restraint System (SRS) Repowering (501-20B Supplemental Restraint System, General Procedures).
Special Tool(s) /
General Equipment
Resistance Spotwelding Equipment
Spot Weld Drill Bit
Locking Pliers
Materials
Name
Specification
Seam SealerTA-2-B, 3M™ 08308, LORD Fusor® 803DTM
-
Removal
NOTE:
Factory welds may be substituted with resistance or MIG
plug welds...
Special Tool(s) /
General Equipment
Resistance Spotwelding Equipment
Spot Weld Drill Bit
Locking Pliers
Materials
Name
Specification
Seam SealerTA-2-B, 3M™ 08308, LORD Fusor® 803DTM
-
Removal
NOTE:
Factory welds may be substituted with resistance or metal
inert gas (MIG) plug welds...
Other information:
Overview
NOTICE:
Repairs of the fuel system are to be achieved only by
replacement of the failed component(s). Repair of a fuel system
component should not be attempted.
NOTICE:
If directed during assembly of fuel system components,
lubricate any seal(s) only with specified material...
Special Tool(s) /
General Equipment
206-D002
(D81L-1103-A)
Gauge, Brake Adjustment
Cable Ties
Adjustment
NOTE:
LHD shown, RHD similar.
Detach the parking brake control boot and position the boot upward on the handle...


 Removal and Installation - Roof Front Frame
 Removal and Installation - Roof Rear Frame