Ford Ecosport: Automatic Transmission - 6-Speed Automatic Transmission – 6F35 / General Procedures - Transmission Case Reseal
Special Tool(s) / General Equipment
 |
100-001
(T50T-100-A)
Slide Hammer |
 |
205-153
(T80T-4000-W)
Handle |
 |
205-990 Installer, Axle Seal TKIT-2012A-FL TKIT-2012A-ROW |
 |
303-D011
(D80L-100-G)
Actuator Pin (Dia 3/16) |
 |
303-D019
(D80L-100-Q)
Collet, 3/4 to 7/8 |
 |
307-003
(T57L-500-B)
Holding Fixture, Transmission |
 |
307-091 Handle, Torque Converter TKIT-2009TC-F |
 |
307-566 Retainer, Torque Converter TKIT-2006C-FFMFLM TKIT-2006C-LM TKIT-2006C-ROW |
 |
307-625 Fixture, Bench Mounting TKIT-2008ET-FLM TKIT-2008ET-ROW |
 |
307-627 Installer, Converter Seal TKIT-2008ET-FLM TKIT-2008ET-ROW |
 |
307-635 Protector, Turbine Shaft Seal TKIT-2008ET-FLM TKIT-2008ET-ROW |
 |
307-718 Installer, Axle Seal TKIT-2013B-FL TKIT-2013B-ROW |
 |
307-718-01 Adaper, 307-718 |
 |
307-723 Installer, Turbine Seal TKIT-2014A-FL |
| Puller | |
Materials
| Name | Specification |
|---|---|
| Motorcraft® Ultra Silicone Sealant TA-29 |
WSS-M4G323-A8 |
Repair
-
Remove the transmission.
Refer to: Transmission (307-01B Automatic Transmission - 6-Speed Automatic Transmission – 6F35, Removal and Installation).
-
For information on component views and base part numbers.
Refer to: Transmission Description (307-01B Automatic Transmission - 6-Speed Automatic Transmission – 6F35, Description and Operation).
-
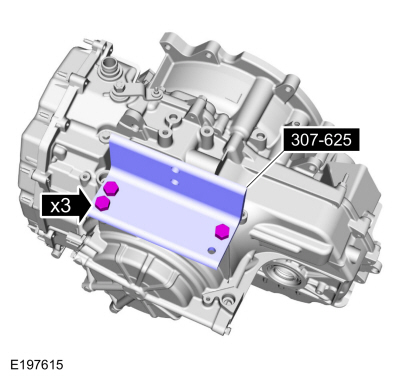
NOTE: Use M10 x 1.5 x 25mm bolts to attach the special tool to the transmission case.
Install the special tool.
Use Special Service Tool: 307-625 Fixture, Bench Mounting.
 |
-
Mount the transmission to the bench-mounted holding fixture.
Use Special Service Tool: 307-003 (T57L-500-B) Holding Fixture, Transmission. , 307-625 Fixture, Bench Mounting.
 |
-
Remove the special tool.
Use Special Service Tool: 307-566 Retainer, Torque Converter.
 |
-
NOTICE: The torque converter is heavy. Be careful not to drop it or damage will result.
Using the special tools, remove the torque converter from the transmission.
Use Special Service Tool: 307-091 Handle, Torque Converter.
 |
-
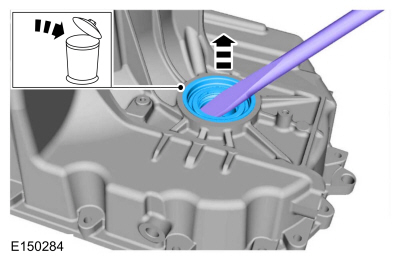
Remove and discard the LH halfshaft seal.
 |
-
Remove and discard the RH halfshaft seal.
 |
-
Remove the torque converter hub seal snap ring.
 |
-
Using a dent puller, remove the torque converter hub seal.
Use the General Equipment: Puller
 |
-
NOTE: Note the location of the stud bolts for assembly.
Remove the torque converter housing bolts.
 |
-
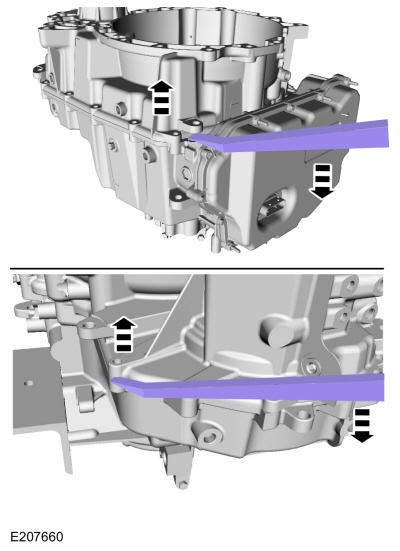
Pry the torque converter housing loose from the transmission case.
 |
-
Remove the torque converter housing from the transmission case.
 |
-
Remove and discard the clutch feed seals.
 |
-
-
NOTE: If the LH transmission case bushing or the LH halfshaft bushing surface shows signs of excessive wear or damage, a new LH transmission case bushing and a new LH halfshaft must be installed, or excessive noise or transmission failure can occur.
Clean and inspect the LH transmission case bushing and the bushing surface on the LH halfshaft for damage or excessive wear. If the LH transmission case bushing or the LH halfshaft shows signs of excessive wear or damage, install new components.
Refer to: Transmission Case (307-01B Automatic Transmission - 6-Speed Automatic Transmission – 6F35, Disassembly and Assembly of Subassemblies).
-
NOTICE: Do not use metal scrapers, wire brushes, power abrasive discs, or other abrasive means to clean sealing surfaces. These tools cause scratches and gouges which make leak paths.
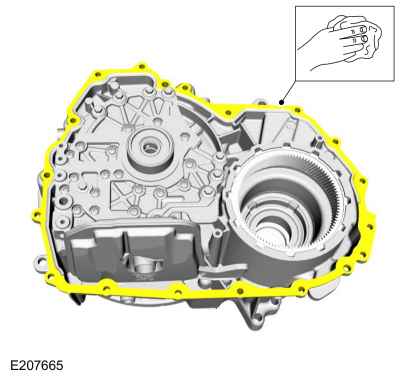
Make sure that the mating faces are clean and free of foreign material.
Refer to: RTV Sealing Surface Cleaning and Preparation (303-00 Engine System - General Information, General Procedures).
-
 |
-
-
Inspect the torque converter housing and the
differential ring gear for damage or excessive wear. If the differential
ring gear shows signs of excessive wear or damage replace the
differential ring gear.
Refer to: Transmission Case (307-01B Automatic Transmission - 6-Speed Automatic Transmission – 6F35, Disassembly and Assembly of Subassemblies).
-
NOTICE: Do not use metal scrapers, wire brushes, power abrasive discs, or other abrasive means to clean sealing surfaces. These tools cause scratches and gouges which make leak paths.
Make sure that the mating faces are clean and free of foreign material.
Refer to: RTV Sealing Surface Cleaning and Preparation (303-00 Engine System - General Information, General Procedures).
-
Inspect the torque converter housing and the
differential ring gear for damage or excessive wear. If the differential
ring gear shows signs of excessive wear or damage replace the
differential ring gear.
 |
-
Assemble the special tools and remove and discard the input shaft seal.
Use Special Service Tool: 100-001 (T50T-100-A) Slide Hammer. , 303-D011 (D80L-100-G) Actuator Pin (Dia 3/16). , 303-D019 (D80L-100-Q) Collet, 3/4 to 7/8.
 |
-
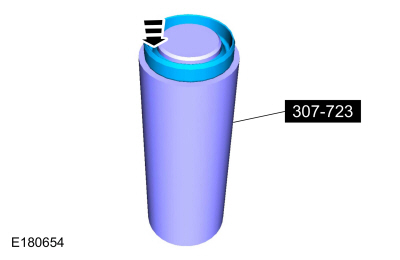
Install a new input shaft seal on the special tool.
Use Special Service Tool: 307-723 Installer, Turbine Seal.
 |
-
Using the special tool, install the input shaft seal.
Use Special Service Tool: 307-723 Installer, Turbine Seal.
 |
-
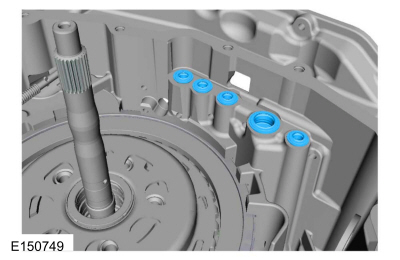
Install the 5 new clutch feed seals.
 |
-
Install the special tool on the input shaft.
Use Special Service Tool: 307-635 Protector, Turbine Shaft Seal.
 |
-
Verify the thrust washer and thrust bearing are correctly installed.
-
No. 13 thrust washer.
-
No. 11 drive sprocket thrust bearing.
-
No. 13 thrust washer.
 |
-
NOTE: Be sure the sealing surfaces of the torque converter housing and the transmission housing are free of oil before applying silicone.
Apply silicone to the sealing surface of the transmission case.
Material: Motorcraft® Ultra Silicone Sealant / TA-29 (WSS-M4G323-A8)
 |
-
Install the torque converter housing on the transmission case.
 |
-
NOTE: Be sure the torque converter housing stud bolt is in the correct location as noted during disassembly.
Install the torque converter housing bolts and the torque converter housing stud bolt.
Torque: 18 lb.ft (24 Nm)
 |
-
Remove the special tool.
Remove Special Service Tool: 307-635 Protector, Turbine Shaft Seal.
 |
-
Install a new torque converter hub seal on the special tool.
Use Special Service Tool: 307-627 Installer, Converter Seal.
 |
-
Using the special tool, install a new torque converter hub seal.
Use Special Service Tool: 307-627 Installer, Converter Seal.
 |
-
Install the torque converter hub seal snap ring.
 |
-
Assemble the special tools. Install a new LH halfshaft seal on the special tool.
Use Special Service Tool: 205-153 (T80T-4000-W) Handle. , 205-990 Installer, Axle Seal.
 |
-
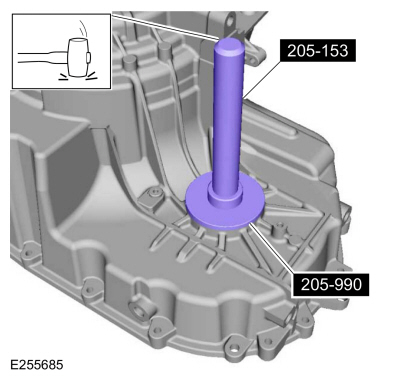
Using the special tools, install the new LH halfshaft seal in the transmission case.
Use Special Service Tool: 205-153 (T80T-4000-W) Handle. , 205-990 Installer, Axle Seal.
 |
-
NOTE: FWD Vehicles.
Assemble the special tools and install a new RH halfshaft seal on the special tool.
Use Special Service Tool: 205-153 (T80T-4000-W) Handle. , 205-990 Installer, Axle Seal.
 |
-
NOTE: FWD Vehicles.
Using the special tools, install the new RH halfshaft seal.
Use Special Service Tool: 205-153 (T80T-4000-W) Handle. , 205-990 Installer, Axle Seal.
 |
-
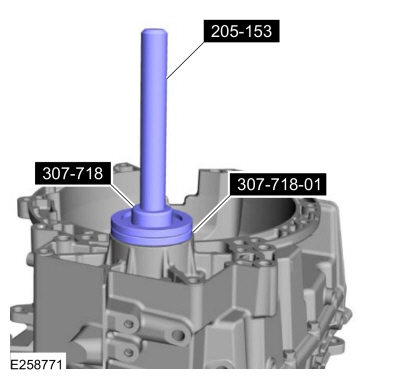
NOTE: AWD Vehicles.
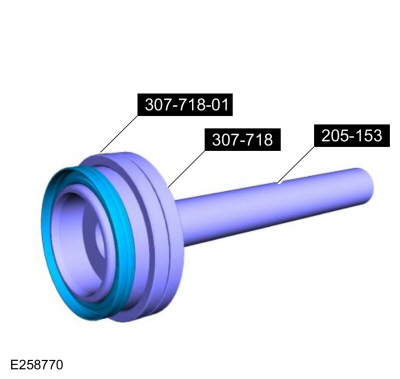
NOTE: Special tool 307-718 is reversible, make sure it is assemble correctly for AWD vehicles.
Assemble the special tools and install a new RH halfshaft seal on the special tool.
Use Special Service Tool: 205-153 (T80T-4000-W) Handle. , 307-718-01 Adaper, 307-718. , 307-718 Installer, Axle Seal.
 |
-
NOTE: AWD Vehicles.
Using the special tools, install the new RH halfshaft seal.
Use Special Service Tool: 205-153 (T80T-4000-W) Handle. , 307-718-01 Adaper, 307-718. , 307-718 Installer, Axle Seal.
 |
-
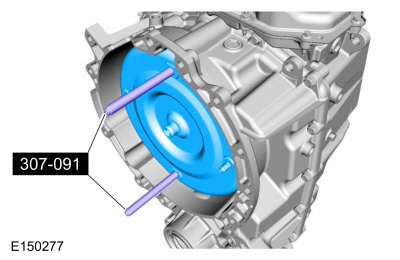
NOTICE: The torque converter is heavy. Be careful not to drop it or damage will result.
Using the special tools, install the torque converter.
Use Special Service Tool: 307-091 Handle, Torque Converter.
 |
-
Install the special tool.
Use Special Service Tool: 307-566 Retainer, Torque Converter.
 |
-
Remove the transmission from the bench-mounted holding fixture.
Use Special Service Tool: 307-003 (T57L-500-B) Holding Fixture, Transmission. , 307-625 Fixture, Bench Mounting.
 |
-
Remove the special tool.
Use Special Service Tool: 307-625 Fixture, Bench Mounting.
 |
-
Install the transmission.
Refer to: Transmission (307-01B Automatic Transmission - 6-Speed Automatic Transmission – 6F35, Removal and Installation).
 General Procedures - Adaptive Learning Drive Cycle
Initialization
NOTE:
The engine and transmission must be at normal operating temperature.
Using the scan tool, clear the DTC and Transmission Adaptive Tables...
 General Procedures - Transmission Fluid Drain and Refill
Materials
Name
Specification
Motorcraft® MERCON® LV Automatic Transmission FluidXT-10-QLVC
WSS-M2C938-AMERCON® LV,
Draining
With the vehicle in NEUTRAL, position it on a hoist...
Other information:
Ford Ecosport 2014-2025 Service and Repair Manual: Removal and Installation - Brake Disc
Materials Name Specification Motorcraft® Metal Brake Parts CleanerPM-4-A, PM-4-B, APM-4-C - Removal NOTE: Removal steps in this procedure may contain installation details. Remove the wheel and tire...
Ford Ecosport 2014-2025 Service and Repair Manual: Removal and Installation - Roof Moulding
Removal NOTE: LH side shown, RH side similar. Remove and discard the roof moulding. Installation NOTE: Make sure that a new component is installed. Install the roof moulding...

