Ford Ecosport: Rear End Sheet Metal Repairs / Removal and Installation - Quarter Panel LH
Ford Ecosport 2014-2025 Service and Repair Manual / Body and Paint / Rear End Sheet Metal Repairs / Removal and Installation - Quarter Panel LH
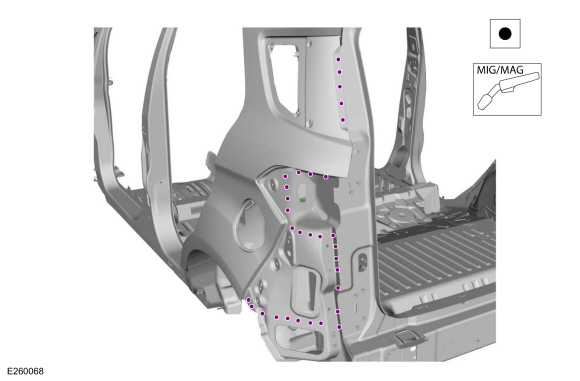
Special Tool(s) / General Equipment
| Resistance Spotwelding Equipment | |
| Spherical Cutter | |
| Grinder | |
| Air Body Saw | |
| 8 mm Drill Bit | |
| MIG/MAG Welding Equipment | |
| Spot Weld Drill Bit | |
| Locking Pliers |
Materials
| Name | Specification |
|---|---|
| Metal Bonding Adhesive TA-1, TA-1-B, 3M™ 08115, LORD Fusor® 108B, Henkel Teroson EP 5055 |
- |
| Seam Sealer TA-2-B, 3M™ 08308, LORD Fusor® 803DTM |
- |
| Flexible Foam Repair 3M™ 08463, LORD Fusor® 121 |
- |
Removal
NOTE: The quarter panel is constructed of mild steel and may be sectioned provided sectioning is done 50 mm or more from hinge mount and restraint anchoring points. The following is intended as a guideline for repair. Adjust to meet repair needs.
NOTE: LH side shown, RH side similar.
-
Restore the vehicle to pre-accident dimensions as required.
Refer to: Body and Frame (501-26 Body Repairs - Vehicle Specific Information and Tolerance Checks, Description and Operation).
-
Depower the SRS .
Refer to: Supplemental Restraint System (SRS) Depowering (501-20B Supplemental Restraint System, General Procedures).
-
Remove the side air curtain.
Refer to: Side Curtain Airbag (501-20B Supplemental Restraint System, Removal and Installation).
-
Remove the rear wheel liner.
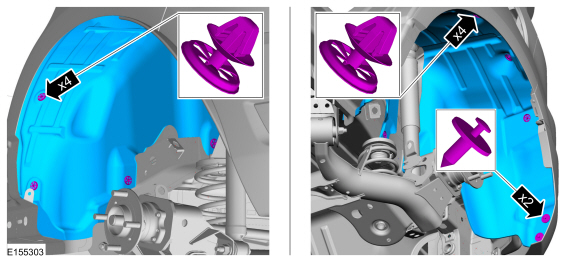 |
-
Remove the following items:
-
Remove the rear seat cushion.
Refer to: Rear Seat Cushion (501-10B Rear Seats, Removal and Installation).
-
Remove the fuel tank filler pipe.
Refer to: Fuel Tank Filler Pipe (310-01B Fuel Tank and Lines - 1.5L Duratec (90kW/120PS) – I3, Removal and Installation).
-
Remove the rear lamp assembly.
Refer to: Rear Lamp Assembly (417-01 Exterior Lighting, Removal and Installation).
-
Remove the rear door.
Refer to: Rear Door (501-03 Body Closures, Removal and Installation).
-
Remove the liftgate.
Refer to: Liftgate (501-03 Body Closures, Removal and Installation).
-
Remove the rocker panel moulding.
Refer to: Rocker Panel Moulding (501-08 Exterior Trim and Ornamentation, Removal and Installation).
-
Remove the rear bumper cover.
Refer to: Rear Bumper Cover (501-19 Bumpers, Removal and Installation).
-
Remove the loadspace trim panel.
Refer to: Loadspace Trim Panel (501-05 Interior Trim and Ornamentation, Removal and Installation).
-
Remove the B-pillar trim panel.
Refer to: B-Pillar Trim Panel (501-05 Interior Trim and Ornamentation, Removal and Installation).
-
Remove the rear seat cushion.
-
Remove the rear door opening weatherstrip and scuff plate.
-
Reposition the carpeting and wiring harness away from the working area.
-
Remove the rear window glass.
Refer to: Fixed Glass (501-11 Glass, Frames and Mechanisms, General Procedures).
-
Carefully cut through the quarter panel outer panel only, using an air body saw or cut-off wheel.
Use the General Equipment: Spherical Cutter
Use the General Equipment: Air Body Saw
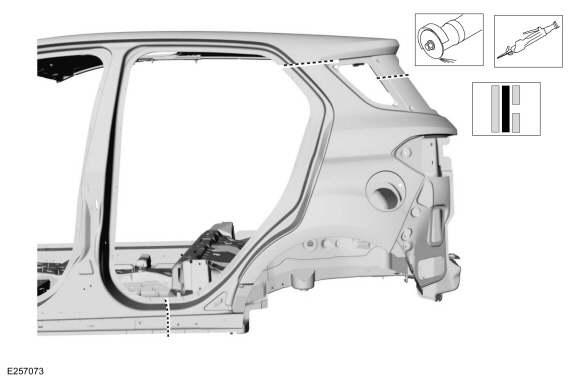 |
-
Remove the spot welds.
Use the General Equipment: Spot Weld Drill Bit
 |
-
Remove the spot welds.
Use the General Equipment: Spot Weld Drill Bit
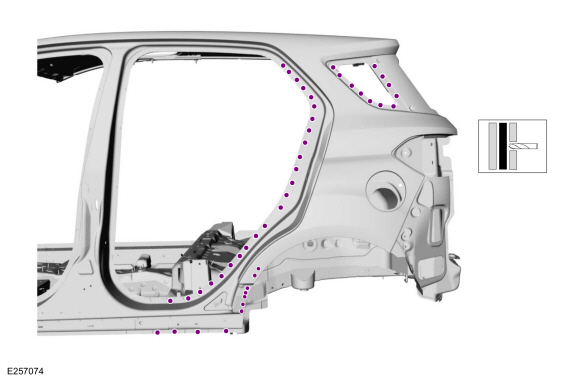 |
-
NOTE: Use of a heat gun may aid in softening adhesive to aid in removal of the panel.
Using a grinder or equivalent tool, grind the hem flange on the wheelhouse and remove the panel.
Use the General Equipment: Grinder
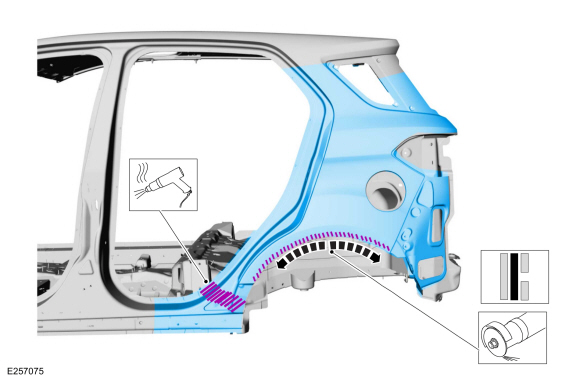 |
Installation
-
Refer to: Joining Techniques (501-25 Body Repairs - General Information, General Procedures).
-
Cut section to fit repair from the replacement service panel.
Use the General Equipment: Air Body Saw
Use the General Equipment: Spherical Cutter
 |
-
-
Drill holes in service panel for plug welding.
Use the General Equipment: 8 mm Drill Bit
-
Drill holes in service panel for plug welding.
 |
-
-
Apply adhesive to flanges and foam sealant to dogleg as indicated.
Material: Metal Bonding Adhesive / TA-1, TA-1-B, 3M™ 08115, LORD Fusor® 108B, Henkel Teroson EP 5055
Material: Flexible Foam Repair / 3M™ 08463, LORD Fusor® 121
-
Apply adhesive to flanges and foam sealant to dogleg as indicated.
 |
-
-
Install the panel, clamp in position and weld at the joints.
Use the General Equipment: Locking Pliers
Use the General Equipment: MIG/MAG Welding Equipment
-
Install the panel, clamp in position and weld at the joints.
 |
-
Weld the rear corner of the panel.
Use the General Equipment: Resistance Spotwelding Equipment
Use the General Equipment: MIG/MAG Welding Equipment
 |
-
Weld the rocker flange.
Use the General Equipment: MIG/MAG Welding Equipment
 |
-
Complete welding of the panel.
Use the General Equipment: Resistance Spotwelding Equipment
 |
-
Metal finish as required using typical metal finishing techniques.
-
Sealing work: All areas must be sealed to production level.
Material: Seam Sealer / TA-2-B, 3M™ 08308, LORD Fusor® 803DTM
- Refinish the repair using a Ford approved paint system.
-
Restore corrosion protection.
Refer to: Corrosion Prevention (501-25 Body Repairs - General Information, General Procedures).
-
Install the side air curtain.
Refer to: Side Curtain Airbag (501-20B Supplemental Restraint System, Removal and Installation).
-
Install the rear window glass.
Refer to: Fixed Glass (501-11 Glass, Frames and Mechanisms, General Procedures).
-
Install the following items:
-
Install the fuel tank filler pipe.
Refer to: Fuel Tank Filler Pipe (310-01B Fuel Tank and Lines - 1.5L Duratec (90kW/120PS) – I3, Removal and Installation).
-
Install the rear lamp assembly.
Refer to: Rear Lamp Assembly (417-01 Exterior Lighting, Removal and Installation).
-
Install the rear door.
Refer to: Rear Door (501-03 Body Closures, Removal and Installation).
-
Install the liftgate.
Refer to: Liftgate (501-03 Body Closures, Removal and Installation).
-
Install the rocker panel moulding.
Refer to: Rocker Panel Moulding (501-08 Exterior Trim and Ornamentation, Removal and Installation).
-
Install the rear bumper cover.
Refer to: Rear Bumper Cover (501-19 Bumpers, Removal and Installation).
-
Install the loadspace trim panel.
Refer to: Loadspace Trim Panel (501-05 Interior Trim and Ornamentation, Removal and Installation).
-
Install the B-pillar trim panel.
Refer to: B-Pillar Trim Panel (501-05 Interior Trim and Ornamentation, Removal and Installation).
-
Install the fuel tank filler pipe.
-
Reposition the carpeting and wiring harness.
-
Install the rear wheel liner.
|
-
Repower the SRS .
Refer to: Supplemental Restraint System (SRS) Repowering (501-20B Supplemental Restraint System, General Procedures).

 Removal and Installation - Water Drain Panel
Special Tool(s) /
General Equipment
Resistance Spotwelding Equipment
8 mm Drill Bit
MIG/MAG Welding Equipment
Spot Weld Drill Bit
Locking Pliers
Materials
Name
Specification
Seam SealerTA-2-B, 3M™ 08308, LORD Fusor® 803DTM
-
Removal
NOTE:
The water drain panel is constructed of mild steel and may
be sect..
Other information:
Ford Ecosport 2014-2025 Service and Repair Manual: Removal and Installation - B-Pillar Trim Panel
Removal NOTE: RH shown, LH similar. NOTE: Removal steps in this procedure may contain installation details. Upper and Lower B-Pillar Trim Panels Position the front door weatherstrip aside. Release the clips and remove the front door scuff plate trim panel. P..
Ford Ecosport 2014-2025 Service and Repair Manual: General Procedures - Fixed Glass
Special Tool(s) / General Equipment Glass Cut-Out Wire Power Caulk Gun Power Fixed Glass Removal Tool Cold Knife Knife Vacuum Cleaner Materials Name Specification Sika® SikaTack® MACH 60 / Sika® SikaTack® MACH 30 / Dow® BETASEAL™ Express - Sika Tack ASAP Urethane Adhesive - Motorcra..
Categories
- Manuals Home
- 2nd Gen Ford Ecosport Service Manual (2014 - 2025)
- Service Information
- Description and Operation - Jacking and Lifting - Overview
- Diagnosis and Testing - Powertrain Control Module (PCM) Input and Output Controls
- Removal and Installation - Fuel Pump and Sender Unit
- Engine
Disassembly - Engine
Special Tool(s) / General Equipment
 205-153
(T80T-4000-W)
205-153
(T80T-4000-W)
Handle
 303-103
(T74P-6375-A)
303-103
(T74P-6375-A)
Holding Tool, Flywheel
T74P-77000-A
TKIT-2009TC-F
 303-1247
VCT Spark Plug Tube Seal Remover and Installer
TKIT-2006UF-FLM
TKIT-2006UF-ROW
 303-15
Copyright © 2025 www.foecosport2.com