Ford Ecosport: Glass, Frames and Mechanisms / Removal and Installation - Front Door Window Glass
Ford Ecosport 2014-2025 Service and Repair Manual / Body and Paint / Glass, Frames and Mechanisms / Removal and Installation - Front Door Window Glass
Removal
NOTE: LH side shown, RH side similar.
NOTE: Removal steps in this procedure may contain installation details.
-
Remove the window control switch.
Refer to: Driver Door Window Control Switch (501-11 Glass, Frames and Mechanisms, Removal and Installation).
Refer to: Passenger Door Window Control Switch (501-11 Glass, Frames and Mechanisms, Removal and Installation).
-
Remove the front door trim panel.
Refer to: Front Door Trim Panel (501-05 Interior Trim and Ornamentation, Removal and Installation).
-
Remove the front door watershield.
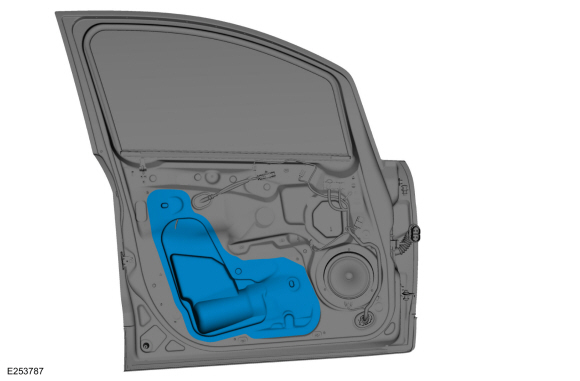 |
-
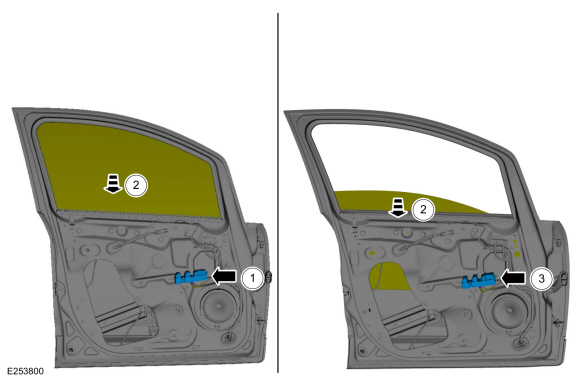
Lower the front door window glass to the three quarters down position.
-
Connect the front door window control switch.
-
Lower the front door window glass to the three quarters down position.
-
Remove the front door window control switch.
-
Connect the front door window control switch.
 |
-
Remove the bolts from the front door window glass.
Torque: 93 lb.in (10.5 Nm)
 |
-
Remove the front door window glass.
-
NOTE: For the RH side, rotate the front door window glass 45 degrees clockwise.
Rotate the front door window glass 45 degrees counter clockwise.
-
Remove the front door window glass.
-
 |
Installation
-
To install, reverse the removal procedure.
-
If the door is equipped with one touch up/down.
Carry out the power door window initialization.
Refer to: Power Door Window Initialization (501-11 Glass, Frames and Mechanisms, General Procedures).
 Removal and Installation - Front Door Glass Top Run
Removal
NOTE:
LH side shown, RH side similar.
Remove the front door window glass.
Refer to: Front Door Window Glass (501-11 Glass, Frames and Mechanisms, Removal and Installation)...
 Removal and Installation - Front Door Window Regulator
Materials
Name
Specification
Thread Locking Sealant
SQ-M4G9523-A
Removal
NOTE:
LH side shown, RH side similar...
Other information:
Ford Ecosport 2014-2025 Service and Repair Manual: Removal and Installation - Rear Exhaust Mounting Bracket
Special Tool(s) / General Equipment 8 mm Drill Bit MIG/MAG Welding Equipment Spot Weld Drill Bit Locking Pliers Removal NOTE: Factory welds may be substituted with resistance or metal inert gas (MIG) plug welds...
Ford Ecosport 2014-2025 Service and Repair Manual: Removal and Installation - Rear Parking Aid Sensor
Removal NOTE: Removal steps in this procedure may contain installation details. Remove the rear bumper cover. Refer to: Rear Bumper Cover (501-19 Bumpers, Removal and Installation). Disconnect the rear parking aid sensor electrical connector(s)...
Categories
- Manuals Home
- 2nd Gen Ford Ecosport Service Manual (2014 - 2025)
- Description and Operation - Jacking and Lifting - Overview
- Automatic Transmission - 6-Speed Automatic Transmission – 6F35
- Removal and Installation - Rear Bumper
- Removal and Installation - Block Heater
- Removal and Installation - Evaporative Emission Canister Purge Valve
Disassembly - Engine
Special Tool(s) / General Equipment
 205-153
(T80T-4000-W)
205-153
(T80T-4000-W)
Handle
 303-103
(T74P-6375-A)
303-103
(T74P-6375-A)
Holding Tool, Flywheel
T74P-77000-A
TKIT-2009TC-F
 303-1247
VCT Spark Plug Tube Seal Remover and Installer
TKIT-2006UF-FLM
TKIT-2006UF-ROW
 303-15
Copyright © 2025 www.foecosport2.com