Ford Ecosport: Automatic Transmission - 6-Speed Automatic Transmission – 6F35 / Removal and Installation - Transmission Fluid Auxiliary Pump
Ford Ecosport 2014-2025 Service and Repair Manual / Automatic Transmission / Automatic Transmission - 6-Speed Automatic Transmission – 6F35 / Removal and Installation - Transmission Fluid Auxiliary Pump
Special Tool(s) / General Equipment
| Hot Air Gun |
Removal
-
With the vehicle in NEUTRAL, position it on a hoist.
Refer to: Jacking and Lifting - Overview (100-02 Jacking and Lifting, Description and Operation).
-
If equipped, remove the engine undershield.
Refer to: Engine Undershield (501-02 Front End Body Panels, Removal and Installation).
-
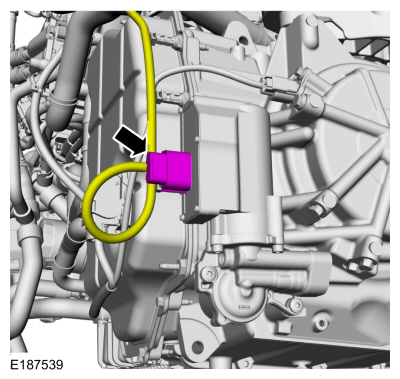
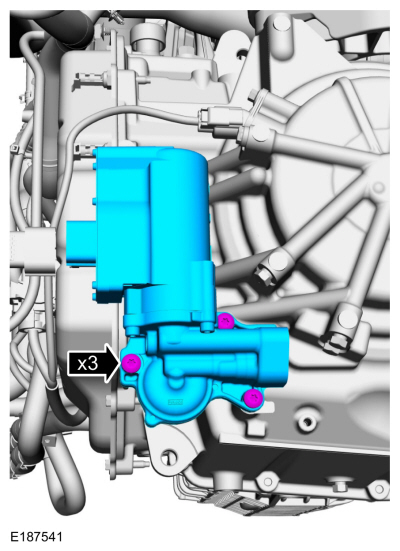
Disconnect the transmission fluid auxiliary pump electrical connector.
 |
-
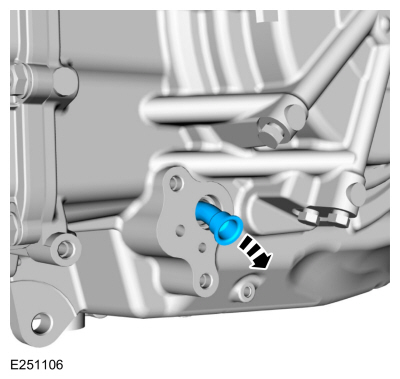
Remove the transmission fluid cooler tube bolt.
 |
-
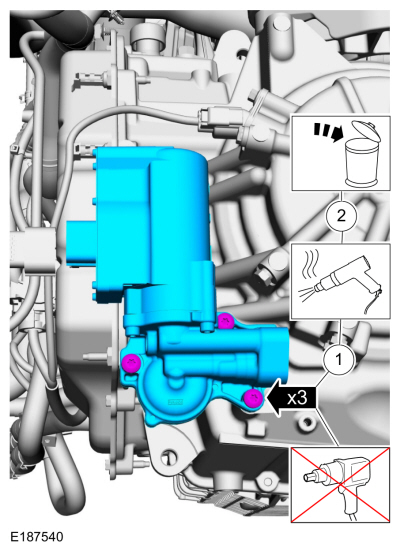
NOTICE: Do not use power tools to remove the transmission fluid auxiliary pump bolts or damage can occur.
NOTE: Be prepared to collect escaping fluid.
Remove the bolts and the transmission fluid auxiliary pump.
-
Apply heat to the bolts to soften the Loctite®.
Use the General Equipment: Hot Air Gun
-
Remove and discard the bolts.
-
Apply heat to the bolts to soften the Loctite®.
 |
-
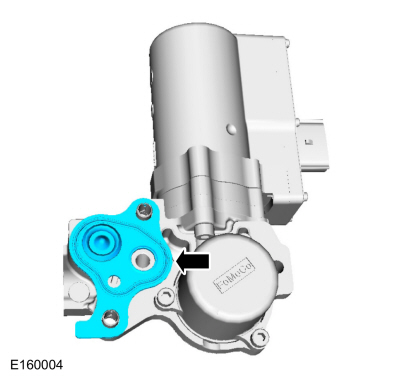
Remove the transmission fluid auxiliary pump gasket.
 |
-
Remove the transmission fluid auxiliary pump supply tube assembly.
 |
-
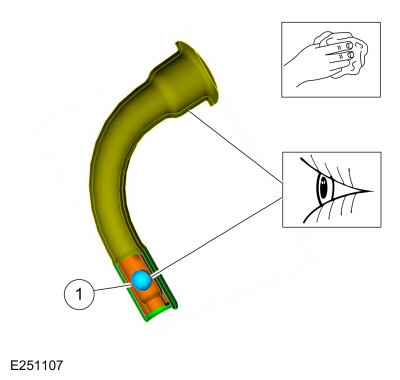
Clean and inspect the transmission fluid auxiliary pump supply tube and check ball.
-
Check ball (part of the transmission fluid auxiliary pump supply tube)
-
Check ball (part of the transmission fluid auxiliary pump supply tube)
 |
Installation
-
Install the transmission fluid auxiliary pump supply tube assembly.
 |
-
Install the transmission fluid auxiliary pump gasket.
|
-
Install the transmission fluid auxiliary pump and new bolts.
Torque: 115 lb.in (13 Nm)
 |
-
Install the transmission fluid cooler tube bolt.
Torque: 97 lb.in (11 Nm)
|
-
Connect the transmission fluid auxiliary pump electrical connector.
|
-
NOTE: TFT must be greater than 38ºC (100ºF) for the PCM to command the pump on.
Using the scan tool verify the TFT is above 38ºC (100ºF).
-
If TFT is below 38ºC (100ºF), run engine at 3000 RPM until specified temperature is achieved (approximately 2-4 minutes).
-
If TFT is below 38ºC (100ºF), run engine at 3000 RPM until specified temperature is achieved (approximately 2-4 minutes).
-
Prime the Transmission Fluid Auxiliary Pump.
-
Key ON, Engine OFF.
-
Using the scan tool, command TRANS_PMP_CMD to 80%
for 30 seconds. If the pump cannot be commanded on, verify TFT is above 38ºC (100ºF).
-
Clear DTCs.
-
Key ON, Engine OFF.
-
Carry out a road test until there is a stop / start
event. If the restart is harsh, repeat the Transmission Fluid Pump prime
procedure.
-
Continue road test and evaluate each stop / start event.
Repeat prime procedure until three consecutive normal stop / start
events are achieved.
-
Check the transmission fluid level.
Refer to: Transmission Fluid Level Check (307-01A Automatic Transmission - 6-Speed Automatic Transmission – 6F15, General Procedures).
-
If equipped, install the engine undershield.
Refer to: Engine Undershield (501-02 Front End Body Panels, Removal and Installation).
 Removal and Installation - Transmission Case Bushing
Removal
To remove the LH halfshaft bushing, transmission disassembly is required.
Refer to: Transmission (307-01A Automatic Transmission - 6-Speed Automatic Transmission – 6F15, Overhaul)...
 Removal and Installation - Transmission Internal Wiring Harness Frame
Special Tool(s) /
General Equipment
307-636Alignment Pins- Valve BodyTKIT-2008ET-FLMTKIT-2008ET-ROW
Removal
Remove the main control cover...
Other information:
Ford Ecosport 2014-2025 Service and Repair Manual: Removal and Installation - Brake Pedal and Bracket
Special Tool(s) / General Equipment Flat-Bladed Screwdriver Removal NOTE: Removal steps in this procedure may contain installation details. NOTE: LHD shown, RHD similar. Remove the driver knee airbag...
Ford Ecosport 2014-2025 Service and Repair Manual: Removal and Installation - Occupant Classification System (OCS) Sensor - Vehicles With: Rear Seat Side Airbag
Removal WARNING: The following procedure prescribes critical repair steps required for correct restraint system operation during a crash. Follow all notes and steps carefully. Failure to follow step instructions may result in incorrect operation of the restraint system and increases the risk of serious personal injury or death in a crash...
Categories
- Manuals Home
- 2nd Gen Ford Ecosport Service Manual (2014 - 2025)
- Removal and Installation - Body Control Module (BCM)
- Removal and Installation - Fuel Pump and Sender Unit
- Removal and Installation - Catalytic Converter
- Automatic Transmission - 6-Speed Automatic Transmission – 6F35
- Removal and Installation - Evaporative Emission Canister Purge Valve
Removal and Installation - Wheel Knuckle Bushing
Special Tool(s) / General Equipment
Hydraulic PressRemoval
NOTE: Removal steps in this procedure may contain installation details.
Remove the wheel knuckle.Refer to: Wheel Knuckle - Vehicles With: Rear Drum Brakes (204-02B Rear Suspension - AWD, Removal and Installation).
Remove the rear toe adjustment retainers and remove the wheel knuckle mounting bracket.
Torque:
Stage 1: 177 lb.in (20 Nm)
Stage 2: 76 lb.ft (103 Nm)
Copyright © 2025 www.foecosport2.com