Ford Ecosport: Rear End Sheet Metal Repairs / Removal and Installation - Rear Floor Panel Section
Special Tool(s) / General Equipment
| Resistance Spotwelding Equipment | |
| Scraper for Straight Edges | |
| Spherical Cutter | |
| Hot Air Gun | |
| Air Body Saw | |
| 8 mm Drill Bit | |
| MIG/MAG Welding Equipment | |
| Spot Weld Drill Bit |
Materials
| Name | Specification |
|---|---|
| Seam Sealer TA-2-B, 3M™ 08308, LORD Fusor® 803DTM |
- |
Removal
-
If Required:
Restore the vehicle to pre-accident dimensions.
Refer to: Body and Frame (501-26 Body Repairs - Vehicle Specific Information and Tolerance Checks, Description and Operation).
-
Remove the rear seat.
Refer to: Rear Seat Backrest (501-10B Rear Seats, Removal and Installation).
-
Remove the Loadspace Trim Panel.
Refer to: Loadspace Trim Panel (501-05 Interior Trim and Ornamentation, Removal and Installation).
-
Position the carpet and all wiring harnesses away from the working area.
-
Remove the back panel and reinforcement.
Refer to: Back Panel and Reinforcement (501-30 Rear End Sheet Metal Repairs, Removal and Installation).
-
NOTE: Use of a heat gun may aid in removing the mastic material.
Remove the NVH mastic pads.
Use the General Equipment: Scraper for Straight Edges
Use the General Equipment: Hot Air Gun
 |
-
NOTE: LH side shown, RH side similar.
Remove the welds.
Use the General Equipment: Spot Weld Drill Bit
Use the General Equipment: Spherical Cutter
 |
-
Cut a portion of floor panel for better access.
Use the General Equipment: Air Body Saw
 |
-
NOTE: It is recommended that sectioning take place over a rear crossmember or brace to assure a quality repair.
Remove the welds.
Use the General Equipment: Spot Weld Drill Bit
 |
-
NOTE: LH side shown, RH side similar.
Remove the welds.
Use the General Equipment: Spot Weld Drill Bit
 |
-
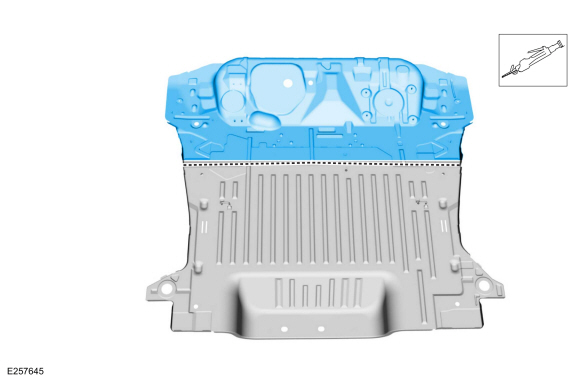
Carefully cut and remove the floor panel section.
Use the General Equipment: Air Body Saw
 |
Installation
NOTE: Factory welds may be replaced with resistance spot welds or MIG plug welds.
NOTE: Resistance spot welds may not be placed directly over original factory welds location. They must equal factory welds in quantity and be placed adjacent to original location.
-
Carefully measure and cut the replacement panel to fit repair area.
Use the General Equipment: Air Body Saw
 |
-
Drill holes for plug welding in the replacement section.
Use the General Equipment: 8 mm Drill Bit
 |
-
Install the floor panel and weld.
Use the General Equipment: Resistance Spotwelding Equipment
Use the General Equipment: MIG/MAG Welding Equipment
 |
-
NOTE: LH side shown, RH side similar.
Weld the flanges.
Use the General Equipment: MIG/MAG Welding Equipment
 |
-
NOTE: LH side shown, RH side similar.
Weld the flanges.
Use the General Equipment: Resistance Spotwelding Equipment
Use the General Equipment: MIG/MAG Welding Equipment
 |
-
Complete welding the floor panel.
Use the General Equipment: MIG/MAG Welding Equipment
 |
-
Metal finish all seams and plug welds using typical metal finishing techniques.
-
Seam Sealing: All seams must be sealed to production level.
Material: Seam Sealer / TA-2-B, 3M™ 08308, LORD Fusor® 803DTM
-
Refinish the entire repair using Ford approved paint system.
-
Install NVH mastic material (obtain locally).
 |
-
Restore corrosion protection.
Refer to: Corrosion Prevention (501-25 Body Repairs - General Information, General Procedures).
-
Install the back panel and reinforcement.
Refer to: Back Panel and Reinforcement (501-30 Rear End Sheet Metal Repairs, Removal and Installation).
-
Reposition the carpeting and the wiring harness to original location.
-
Install the Loadspace Trim Panel.
Refer to: Loadspace Trim Panel (501-05 Interior Trim and Ornamentation, Removal and Installation).
-
Install the rear seat.
Refer to: Rear Seat Backrest (501-10B Rear Seats, Removal and Installation).
 Removal and Installation - Rear Floor Panel Reinforcement
Special Tool(s) /
General Equipment
8 mm Drill Bit
MIG/MAG Welding Equipment
Spot Weld Drill Bit
Locking Pliers
Removal
NOTE:
Factory welds may be substituted with resistance or metal
inert gas (MIG) plug welds...
 Removal and Installation - Rear Lamp Mounting Panel
Special Tool(s) /
General Equipment
8 mm Drill Bit
MIG/MAG Welding Equipment
Spot Weld Drill Bit
Locking Pliers
Materials
Name
Specification
Seam SealerTA-2-B, 3M™ 08308, LORD Fusor® 803DTM
-
Removal
NOTE:
Factory welds may be substituted with resistance or metal
inert gas (MIG) plug welds...
Other information:
Ford Ecosport 2014-2026 Service and Repair Manual: Description and Operation - Direct Clutch Assembly
Direct (3, 5, R) Clutch Exploded View Item Description 1 Direct clutch cylinder snap ring 2 Direct clutch cylinder 3 Direct clutch piston 4 Direct clutch piston return spring 5 Direct clutch piston seals 6 ..
Ford Ecosport 2014-2026 Service and Repair Manual: Removal and Installation - Wheel Bearing and Wheel Hub - Vehicles With: Rear Drum Brakes
Special Tool(s) / General Equipment 204-161 (T97P-1175-A) Installer, HalfshaftTKIT-1997-LM2TKIT-1997-F/FM2TKIT-1997-FLM2 204-348/3Remover/Installer, Wheel Hub/Wheel Bearing 205-D070 (D93P-1175-B) Remover, Front Wheel Hub 308-095Installer, Input Shaft Bearing 308-604Installer, Output Drive Flange Seal 308-643Installer, Input..
Categories
- Manuals Home
- 2nd Gen Ford Ecosport Service Manual (2014 - 2026)
- Removal and Installation - Blower Motor
- Removal and Installation - Catalytic Converter
- Specifications
- Diagnosis and Testing - Evaporative Emissions
- Body and Paint
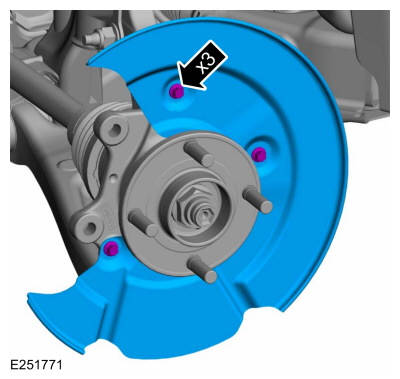
Removal and Installation - Brake Disc Shield
Removal
NOTE: Removal steps in this procedure may contain installation details.
Remove the brake disc.Refer to: Brake Disc (206-03 Front Disc Brake, Removal and Installation).
Remove the bolts and brake disc.
Torque: 80 lb.in (9 Nm)