Ford Ecosport: Side Panel Sheet Metal Repairs / Removal and Installation - A-Pillar Assembly
Ford Ecosport 2014-2025 Service and Repair Manual / Body and Paint / Side Panel Sheet Metal Repairs / Removal and Installation - A-Pillar Assembly
Special Tool(s) / General Equipment
| Resistance Spotwelding Equipment | |
| Hot Air Gun | |
| 8 mm Drill Bit | |
| MIG/MAG Welding Equipment | |
| Spot Weld Drill Bit |
Materials
| Name | Specification |
|---|---|
| Adhesive | - |
Removal
-
-
Remove the A-Pillar Outer Panel.
Refer to: A-Pillar Outer Panel (501-29 Side Panel Sheet Metal Repairs, Removal and Installation).
-
Reposition the carpeting and the wiring harness away from the working area.
-
Remove the A-Pillar Outer Panel.
-
-
Remove the welds.
Use the General Equipment: Spot Weld Drill Bit
-
Remove the welds.
 |
-
NOTE: Note the location of adhesives/sealers to aid in installation.
-
Break the adhesive bond and remove the A-pillar reinforcement.
Use the General Equipment: Hot Air Gun
-
Break the adhesive bond and remove the A-pillar reinforcement.
 |
Installation
-
NOTE: Sealer or adhesive must not be applied in welding zones. Areas which were bonded or sealed needs to be thoroughly sealed afterwards.
Refer to sealer, underbody protection material and adhesive instructions in the workshop manual.
Refer to: Sealer, Underbody Protection Material and Adhesives (501-25 Body Repairs - General Information, Description and Operation).
-
-
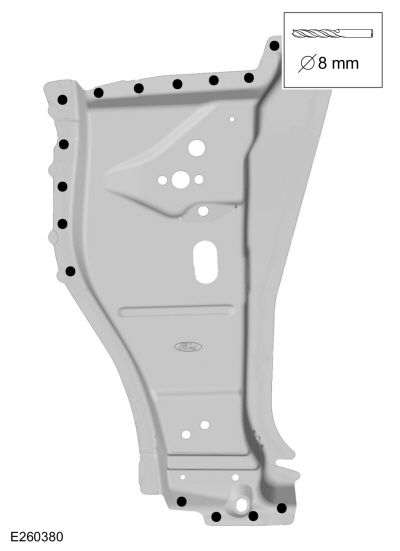
Drill 8 mm holes as indicated.
Use the General Equipment: 8 mm Drill Bit
-
Drill 8 mm holes as indicated.
 |
-
Apply adhesive in areas noted during removal.
Material: Adhesive
-
-
Install the A-pillar reinforcement properly position and clamp.
-
Install the A-pillar reinforcement properly position and clamp.
 |
-
-
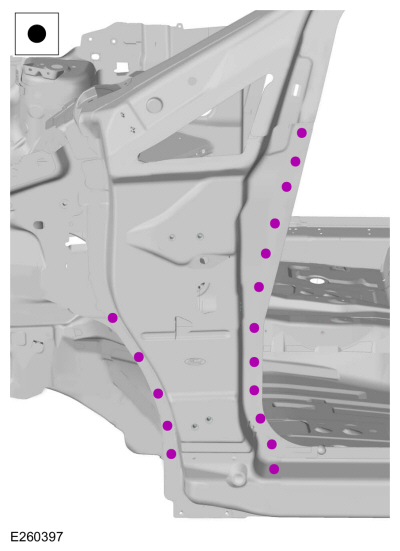
Install the welds.
Use the General Equipment: Resistance Spotwelding Equipment
-
Install the welds.
 |
-
-
Install the welds using MIG welder.
Use the General Equipment: MIG/MAG Welding Equipment
-
Install the welds using MIG welder.
 |
-
-
Install the A-Pillar Outer Panel.
Refer to: A-Pillar Outer Panel (501-29 Side Panel Sheet Metal Repairs, Removal and Installation).
-
Install the A-Pillar Outer Panel.
 Removal and Installation - A-Pillar Upper Reinforcement
Special Tool(s) /
General Equipment
Resistance Spotwelding Equipment
Spot Weld Drill Bit
Locking Pliers
Materials
Name
Specification
Seam SealerTA-2-B, 3M™ 08308, LORD Fusor® 803DTM
-
Removal
NOTE:
It is highly recommended the replacement panel be present before making any sectioning cuts on the vehicle...
 Removal and Installation - Front Door Skin Panel
Special Tool(s) /
General Equipment
Grinder
Hot Air Gun
Knife
Locking Pliers
Materials
Name
Specification
Metal Bonding AdhesiveTA-1, TA-1-B, 3M™ 08115, LORD Fusor® 108B, Henkel Teroson EP 5055
-
Seam SealerTA-2-B, 3M™ 08308, LORD Fusor® 803DTM
-
Flexible Foam Repair3M™ 08463, LORD Fusor® 121
-..
Other information:
Ford Ecosport 2014-2025 Service and Repair Manual: Removal and Installation - D-Pillar Moulding
Removal NOTE: LH side shown, RH side similar. Carefully open the liftgate. Remove the D-pillar moulding screws and remove the D-pillar moulding. Installation NOTE: Make sure that a new component is installed. Install the D-pillar moulding. Torque: 15 lb.i..
Ford Ecosport 2014-2025 Service and Repair Manual: Removal and Installation - Blower Motor
Removal NOTE: Removal steps in this procedure may contain installation details. Remove the brake pedal and bracket assembly. Refer to: Brake Pedal and Bracket (206-06 Hydraulic Brake Actuation, Removal and Installation). Disconnect the electrical connector, remove the retainers and the blower motor. Installation ..
Copyright © 2025 www.foecosport2.com
